From BlackWhite magazine - issue 07, finishing touch
Unlock the power of these adaptable Resene products to create project-specific bespoke solutions.
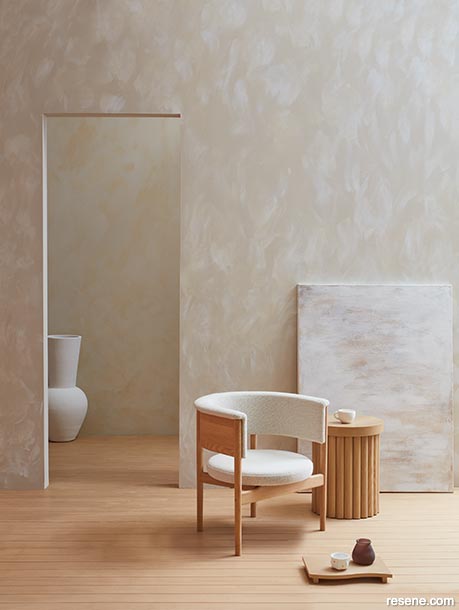
When it comes to the versatility of different results you can achieve, Resene FX Paint Effects Medium is tough to beat. This semi-translucent formula can be mixed with a small quantity of a Resene paint colour of your choice and applied in a variety of ways. You can build up more layers to increase the effect or apply it mixed with a second or third colour for a more variegated look. With the right colours and artistic application, it can be used to imitate limewashing, concrete, marble, granite and more.
Front wall painted in Resene Triple Blanc with Resene FX Paint Effects Medium mixed with Resene Eighth Blanc applied over the top, back wall (through doorway) painted in Resene Triple Blanc with Resene FX Paint Effects Medium mixed with Resene Canterbury Clay applied over the top, floor and side table finished in Resene Colorwood Bask, artwork painted in Resene Gold Coast and Resene Saddle Brown with Resene FX Paint Effects Medium mixed with Resene Eighth Blanc over the top, tall vase and mug painted in Resene Eighth Blanc and wavy tray painted in Resene Amaranth. Chair and cup from Good Form, votive and small vase from Smith & Caughey's.
In a perfect world, our buildings would be designed and built with only the highest quality materials to make them as timeless, enduring and beautiful as possible. Of course, in reality, there are a host of reasons why we can’t always use the materials we’d like to when and where we want to. For starters, premium materials come with premium price tags that might be well outside the project budget, lead times could be too long or the space itself could have limitations that prevent their installation.
In these circumstances, the trouble with substituting many typical faux materials meant to represent timber, stone, marble, granite and other valuable finishes is that they’re often poorly made from less-than-desirable, unsustainable and sometimes toxic ingredients. This can result in not only an entirely unconvincing effect that wears out fast but one that can have detrimental effects on both the planet and your project users.
Rather than tacky and short-lived finishes that detract from the quality of the space, a paint effect or specialty finish might be the optimal choice instead of – or alongside – authentic materials. We look at a number of scenarios where using Resene products could be the ideal solution for your project, the surprising level of flexibility they offer and how to play to each product’s strengths for a gorgeous finish that will enhance your overall design.
After removing old tiles, wallcoverings or ‘popcorn’ ceilings, you could find that the substrate beneath is no longer smooth despite concerted efforts to even it out. Luckily, Resene has a number of interesting product options for improving the look of imperfect surfaces. While you will still want your starting point to be in clean and sound condition (free from dust, debris, loose/flaking paint and leftover adhesives), applying a Resene paint effect or specialty finish can help mask or distract from the appearance of bumps, divots and roughness.
Resene FX Paint Effects Medium is among the most popular, economical and trendworthy options for addressing uneven wall or ceiling surfaces. Depending on what paint colours you opt for and how you choose to apply it, the options for the looks you can create with Resene FX Paint Effects Medium are practically limitless. Plus, it can be layered with other Resene decorative effects to create paint effects on walls, floors, ceilings, furniture, joinery and more, inside and out.
Over the past few years, limewash looks and similarly mottled paint effects have skyrocketed in popularity on social media platforms and become highly sought-after among clients who want an easy-going, earthy or Mediterranean vibe in their space. The key to achieving these types of paint effects, which have come to be synonymous with the covetable ‘liveable luxury’ look, lies in specifying colours that don’t contrast too sharply – which could potentially make your effect look like the dated rag-rolling styles of the 80s and 90s. Instead, you’ll want to opt for subtly different shades. For a natural, contemporary look, choose two hues from the same Resene colour card or two different strengths of the same hue – such as Resene Triple Duck Egg Blue and Resene Half Duck Egg Blue. While there is no hard and fast rule, even selecting two colour chips that are right next to one another can still appear perceivably different when layered together in combination with Resene FX Paint Effects Medium.
It’s also important to keep in mind that the order in which your paint colours are applied will have an impact on the final paint effect. Applying a darker hue over a lighter one often produces a more pronounced effect than when a lighter paint colour is applied over a darker colour – but this can vary by applicator and technique. It’s recommended to create a sample panel on a primed piece of MDF, wood or plasterboard before you and your client decide on the final colour combination and application order. This panel can also be referenced by your applicator when it comes time to paint.
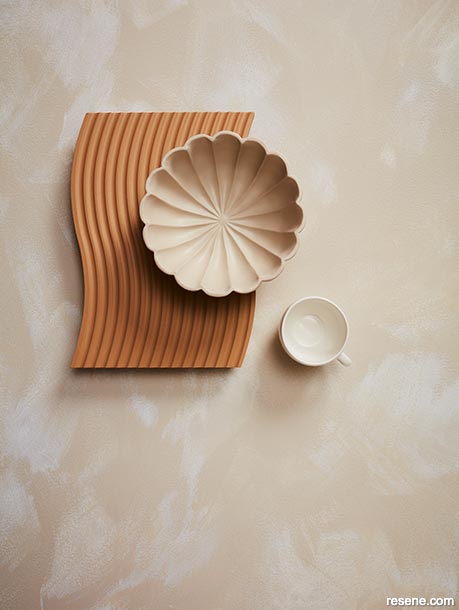
Layering beige and cream together using Resene FX Paint Effects Medium can result in a soft suede-like look. Pair it with other earthy tones to create a decadent backdrop suitable for a space that exudes ‘quiet luxury’.
Background painted in Resene Triple Blanc with Resene FX Paint Effects Medium mixed with Resene Eighth Blanc applied over the top, wave tray painted in Resene Amaranth, scalloped bowl painted in Resene Tua Tua and mug painted in Resene Eighth Blanc.
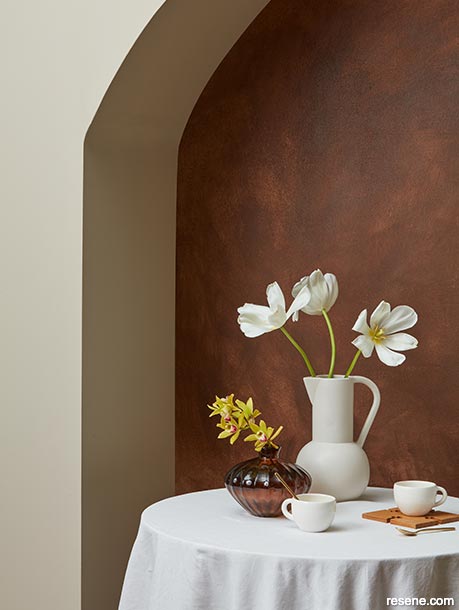
Resene FX Paint Effects Medium can be applied over top of Resene’s tactile textured finishes like Resene Sandtex and Resene Resitex to enhance their visual depth.
Walls painted in Resene Double Parchment, alcove in Resene Sandtex Mediterranean effect in Resene Double Parchment enhanced with Resene FX Paint Effects Medium mixed with Resene Allspice applied over the top and tall jug in Resene Half Tea. Brown glass vase from Smith & Caughey’s, cups and trivet from Good Form.
For best results, start with two coats of your chosen Resene formula tinted to the colour you want to use for your basecoat. Then, we recommend building up multiple thin layers of Resene FX Paint Effects Medium mixed with your chosen topcoat colour for a softer, more natural effect. In areas where you feel the topcoat colour has been applied too strongly, the effect can be easily muted by using a clean, dry rag to apply more of your base colour to those areas.
top tip For a more complex and nuanced paint effect, you can even specify a second or third colour to be mixed into Resene FX Paint Effects Medium. These subsequent colours can be applied to add additional highlights, lowlights and complexity to your effect. Be sure to create a test panel first to ensure you and your client are happy with the final effect so you both can be fully confident in the order your hues should be applied.
There’s no denying that marble and granite are pricey luxuries. While the look of these materials is hugely desirable, they can be cost prohibitive for many projects, often need to be special ordered and can have very long lead times. Something else that doesn’t get discussed widely is that mining marble and granite has significant impacts on the planet and the people who work to extract them – which should definitely be taken into consideration by clients and designers that have ethical or environmental goals for their project.

Use Resene FX Faux Rust Effect on non-contact décor items indoors or outdoors such as light fixtures, brackets, garden walls and plant pots.
Background, bowls and tray in Resene FX Faux Rust Effect.
A marbled paint effect, on the other hand, can be taken across walls, floors and more for a tiny fraction of the price. It can also be a great option for retail or gallery displays and in other projects where you want to tap into this popular trend but installations, fixtures or décor are expected to be changed frequently. Plus, these effects don’t require the time, expense and effort of demolition to remove them if trends or tastes change, as they can simply be painted over to create a fresh new look.
While achieving a marble or granite effect may take a little more time and talent than other paint effects, these efforts will be evident in the results. We recommend finding a photo reference to show your specialist or artistic painter and getting their advice on colours before finalising your selections as it can often take two to four hues (or even more) in combination with Resene FX Paint Effects Medium for a convincing look.
top tip To get the shimmering or sparkling qualities of quartz in your paint effect, try incorporating Resene FX Metallic paint or Resene FX Pearl Shimmer.
Brutalist concrete looks are also trending, which can be a very desirable decorative finish when you’re after an edgy or industrial vibe for a restaurant, salon, gallery, office or retail space. If you’re designing a project from the ground up or the existing space already has these materials in place for you to embrace, great. But if you’re trying to introduce these materials through a renovation, there could be structural, cost or tenancy limitations that prevent you from doing so. Getting a concrete look on non-concrete surfaces using Resene FX Paint Effects Medium is not only an affordable alternative, but it’s a lot easier than you might expect.
When most people think of concrete, they think ‘grey’. But in reality, most concrete actually contains quite a bit of brown colouring. For a convincing concrete paint effect, we recommend starting with a soft taupe brown like Resene Sandcastle for your basecoat then applying one or more Resene greys on top that have been mixed with Resene FX Paint Effects Medium, such as Resene Concrete. Use a wide, soft bristled brush to apply it in a criss-cross motion and use a clean, dry rag to blend the effect. Work quickly in small sections to apply the product in thin coats, adding subsequent layers to intensify the effect. For even more depth and ‘age’, add a final layer of slightly darker Resene Quarter Arrowtown. If your effect appears too strong or uneven, simply use another dry, clean rag to rub in a little bit of your basecoat colour to reduce the intensity of those areas. When topcoating your design, choosing a flat clear coat to seal it, such as Resene Concrete Clear Flat, can be used to achieve a rawer look. For a high-polished effect, choose a higher gloss finish such as Resene Concrete Clear Gloss instead.
Resene FX Paint Effects Medium can also be used to create paint effects on painted floors. Be sure to start with a primer and formula that are meant for walkable surfaces, like Resene Quick Dry waterborne primer undercoat (on bare timber) and Resene Walk-on flooring and paving paint. Using Resene products designed for horizontal surfaces helps ensure they will perform as intended and reduces the risk of unnecessary slipperiness which could occur from applying the wrong products. Contact your Resene Representative or the Resene Technical Advice Team for help choosing the right flooring finish for your project.
Thanks to advancements in coatings technology, getting an authentic-looking rust effect is now achievable in mere hours rather than years. Resene FX Faux Rust Effect is a two-pack waterborne coating system that imparts a rust-style effect to a range of surfaces both indoors and out. Once applied, it provides you with the aesthetic effect of rusting that, like normal rust, will continue to develop as the coating ages.
Something that makes Resene FX Faux Rust Effect so special – and what many designers find surprising – is the variety of substrates it can be used on. Rather than simply metal, Resene FX Rust Effect can also be applied to properly prepped and primed interior or exterior blockwork, concrete, fibreboard, MDF, timber, plaster, plastic and more. Try it on light fixtures, ceilings, signage, shelf brackets, garden screens, retaining walls, plant pots, vases and small décor accents. But keep in mind while designing that Resene FX Faux Rust Effect is intended to be looked at rather than touched so it should only be used for non-contact surfaces to avoid colour transfer.
If you’re new to using Resene FX Faux Rust Effect, start small and work on a sample area first. Your end result is dependent not only on the products but also on the style of application technique, so it’s important to agree on a sample panel with your applicator prior to the project being undertaken. We recommend your sample panel to be at least 70cm x 70cm (half a square metre) so that it’s large enough to get a good idea of how the application technique will look when applied to your full surface. The best effects are obtained using a wide paintbrush with brushstrokes applied in random directions with a consistent technique used across the entire surface. Remember not to cut in as this will result in an undesirable ‘picture frame’ border around the edges of your surface.

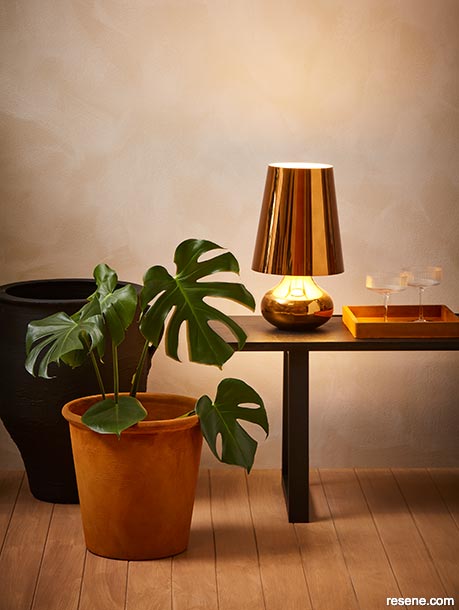
Specifying and applying two coats of Resene FX Faux Rust Effect basecoat followed by two coats of Resene FX Faux Rust Effect Activator gives the best results. The deepest rust effect is obtained if the first application of activator is applied as soon as the second basecoat is tacky or touch dry, and the second application takes place within 24 hours of applying your basecoats. It’s recommended to apply the second application of activator as soon as the first is dry, which typically takes less than one hour. Apply the Resene FX Faux Rust Effect Activator solution using random brushstrokes until the basecoat is completely covered as missed areas will not develop the rust effect.
Rusting begins immediately after the activator is applied. Within one hour, visual rust will be noticeable with most of the rust development occurring within 12 hours. Applying clean water 12-24 hours after your activator solution has dried with a mister, brush or roller will produce a deeper rust effect. Repetitive water misting will increase the rate of rust development, so the more you do it, the deeper the rust effect colour will be.
top tip Only specify Resene FX Faux Rust Effect for non-contact surfaces that aren’t regularly touched to avoid the chance of the effect rubbing off on to hands or clothing.
Resene FX Metallic paint and Resene FX Pearl Shimmer offer an array of opportunities to add some glitter and glamour to a huge range of substrates. Many designers and applicators have relied on them for updating heritage projects where the look of metal leaf needs to be reinstated, but they are also popular options for adding sparkle to small décor accents or applying over textured, anaglypta-style designs from the Resene Wallpaper Collection to achieve the effect of tin ceiling tiles or wall panelling.
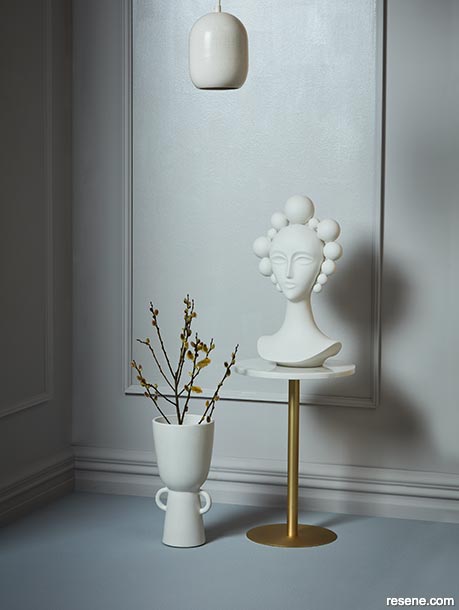
Give any Resene paint colour a gorgeous, shimmering quality by overcoating it with Resene FX Pearl Shimmer.
Walls, skirting boards and moulding painted in Resene Kinship, inner panelling and vase topcoated with Resene FX Pearl Shimmer and floor painted in Resene Half Grey Chateau. Pendant lamp from Good Form, bust from Smith & Caughey’s.
To get the same look you see on the Resene Metallics and special effects colour chart, be sure to apply the correct undercoat colour – which appears in brackets beneath the colour chip. Different looks can be achieved by starting with a different basecoat colour, or by layering multiple Resene FX Metallic paint colours over one another, so don’t be afraid to experiment if you’re after something truly unique (just be sure to make a test panel first before finalising your specification).
The recently released Resene FX Metallics Wallpaper Collection also offers designers, specifiers and applicators simplified application of the same collection of Resene FX Metallic colours featured in the Resene Metallics and special effects colour chart for broadwall surfaces like walls and ceilings. These wallpapers are manufactured locally in New Zealand and are made with real Resene FX Metallic paints. Learn more about this exciting new collection in "Shimmer by the roll."
Speaking of wallpaper, the Resene Wallpaper Collection has plenty of other options for transforming plasterboard walls and ceilings to create the effect that these surfaces are made from other materials. This is not only useful for projects where budgets or timelines would make using authentic versions of the same materials prohibitive but also in projects where engineering forbids them. There are plenty of examples where designers could butt up against these circumstances, particularly when renovating or redesigning previously-built structures. Materials like brick, stone and concrete might provide the look you want in your design, but they are notoriously heavy and incorporating the real thing could potentially overload your structure. Certain tenancies also have strict guidelines around making permanent changes to rental spaces so bringing these materials into your project design may not be feasible in the first place.
Whether you want to enhance your project with the look of timber cladding, aged or polished concrete, brick, masonry blocks, marble, granite, terrazzo or tile, you’re sure to find a design in the Resene Wallpaper Collection to suit. View a selection of the most recent releases online at www.resene.com/wallpaper or visit your local Resene ColorShop to view the full collection. Wallpapers are always best viewed in person to fully appreciate the designs, colours and textures. Samples are available for many Resene wallpapers upon request – order online at www.resene.com/wallpaper or contact your Resene Representative or local Resene ColorShop.
Remember that most wallpapers are often only available for sale for two to three years at most, with popular designs selling out even faster, so always make sure you can secure enough rolls for your entire project from the start. It often pays to purchase an extra roll or two in case more is needed later, which will allow your client the ability to easily replace sections if their wallpaper is accidentally damaged in the future.
Resene Colorwood and Resene Woodsman wood stains are popular for enhancing and protecting natural timber surfaces indoors and out. But if you want the wood used in your project to take on an aged look or a tinted colour effect, Resene’s timber colourwashes offer a unique alternative. Unlike penetrative stains, Resene Whitewash, Resene Light Greywash, Resene Mid Greywash and the colourwashes in the Resene We Speak Beach collection are finishes that sit on top of the wood’s surface to change their look. Available in both Resene Colorwood (interior) and Resene Woodsman (exterior) formulas, these finishes can be used on wood floors, walls, decking, cladding, furniture, accessories and more. When used inside, seal and protect with the recommended Resene clear coat that correlates with the demands of the surface you’re colouring.
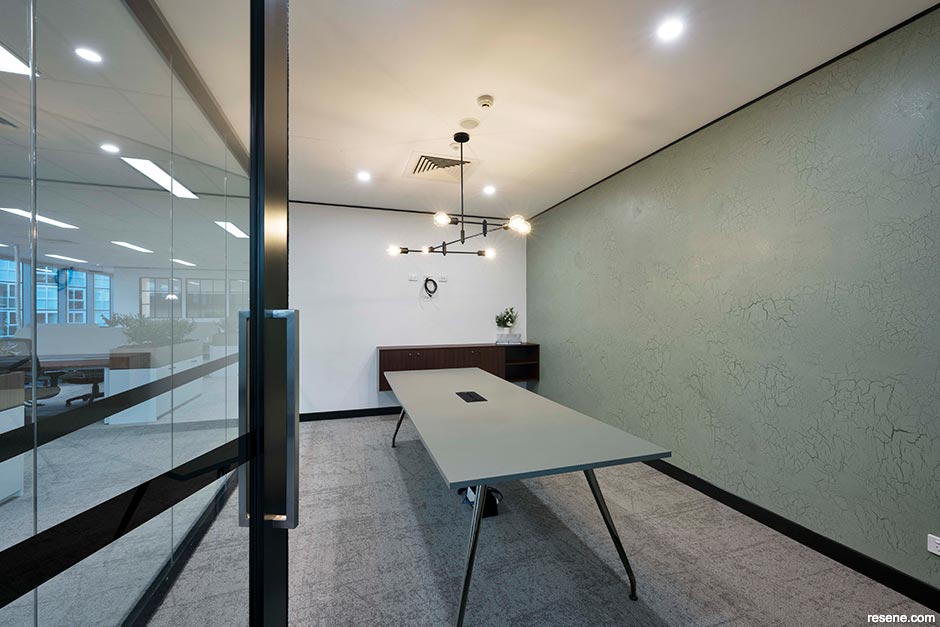
The final look of your timber whitewash, greywash or colourwash will depend on the wood’s inherent colour so it’s best to always test your colour first on a representative sample of timber. Two coats are recommended, which will obscure but not completely cover the wood’s natural grain. While timber colourwashes may make your project’s wood surfaces look aged, these products actually help to protect and maintain the integrity of your timber substrates so your client’s investment lasts longer by helping protect it from harmful UV or moisture damage. And if a different look is desired later on, these finishes can simply be sanded down and wiped clean of dust and debris before a different Resene wood stain or colourwash and clear coat are applied.
Resene FX Crackle is another interesting option for creating an aged effect. Depending on your Resene colour choices and the order you apply them, the combinations for a distinctive crackle finish are virtually limitless. Before applying Resene FX Crackle, you can apply two or more basecoats in a single colour tinted into an acrylic formula such as Resene Lumbersider Low Sheen or Resene Zylone Sheen. For a more unique effect, Resene FX Paint Effects Medium mixed with one or more other Resene colours can also be brushed or wiped on prior to applying your Resene FX Crackle coat. After applying Resene FX Crackle, a final coat of an acrylic topcoat tinted to a Resene colour that contrasts with your basecoats gets applied. Then, the Resene FX Crackle coat will shrink, causing your acrylic topcoat to crack and reveal the basecoat colours beneath.
Your crackle effect can also vary depending on the application method used. A thick coat of Resene FX Crackle will result in fewer larger, deeper cracks while a thin coat will give smaller, shallower cracks. Crackle effect finishes are great options for uneven or rough walls, furniture, picture frames, woodwork and other small feature areas. As with other paint effect products, be sure to create and sign-off on a sample panel before the job starts and provide it to the applicator to reference during their work on the project.
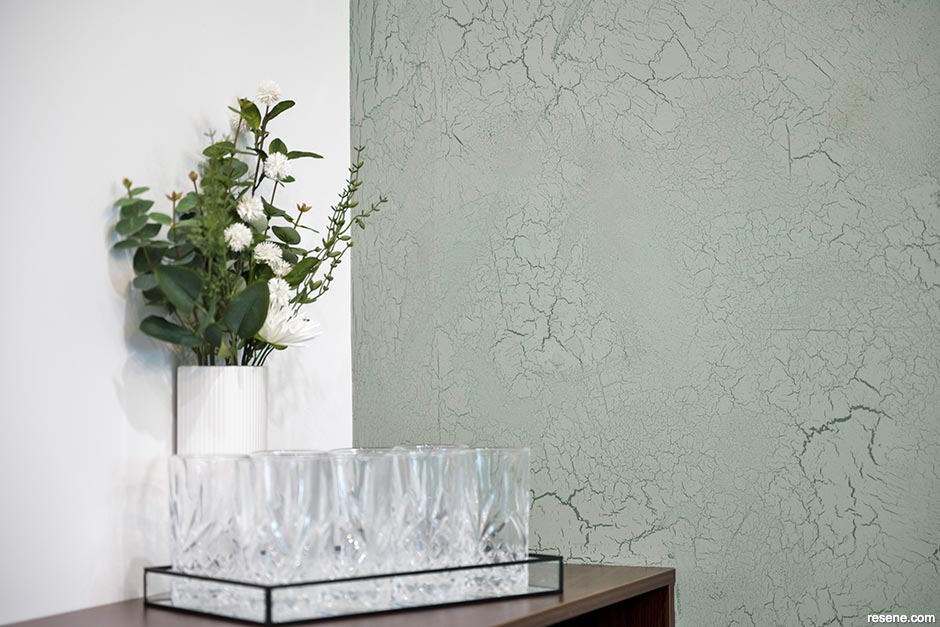
To get the look of sandstone or plaster on concrete, block or brickwork, plasterboard and more, Resene Sandtex and Resene Resitex are popular choices. Available in different sized ‘grits’, you can choose coarser or finer variants depending on the effect you’re after. These products can be applied by spray or synthetic fibre roller for the most uniform finish or apply them with a brush in a criss-cross motion for a brushed plaster or ‘crows foot’ effect. Apply two, three or more coats of Resene Sandtex and Resene Resitex to build up more textured particles for a denser sandstone or Mediterranean-style finish.
While these finishes are pre-tinted to your specified Resene colour, you can also further enhance the appearance of their tactile texture by overcoating them with a brush, roller or sponge using Resene FX Paint Effects Medium mixed with a contrasting colour. The added paint effect will cling to the textured particles and increase the visual depth of the finished surface.
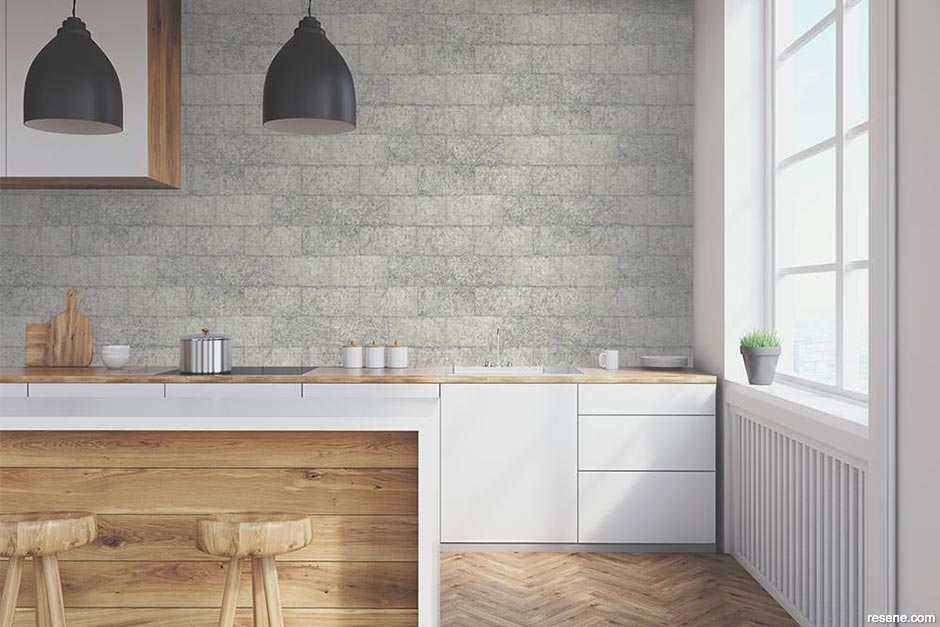
For other high-performance textured interior and exterior cladding systems, Resene Construction Systems offers a range of advanced integrated systems in enduring finishes. Creating similar effects to what you’d find in old world countries like Morocco, Japan, Italy, Greece, Spain and Portugal is within reach using products like ROCKCOTE Clay Decor, Marrakesh Lime Plaster Finishes, Otsumigaki Japanese Clay/Lime Finishes, Velvetina Lime Finish and Venetian Polished Interior Finishes. For building exteriors, there are plenty of different options to get textured plaster and masonry finishes through Resene Construction Systems’ wide selection of offerings. Contact your Rockcote Representative for more information.
During interviews with some of New Zealand and Australia’s most talented special effects painters, artists, set builders and prop designers, we’ve found that the majority actively experiment with using and layering Resene products and formulas in new and innovative ways. Often these installations are temporary, so the product applications don’t need to meet the same performance requirements as projects built to stand the test of time. Plus, they’re often undertaken with a great deal of trial and error before figuring out what will work for their needs.
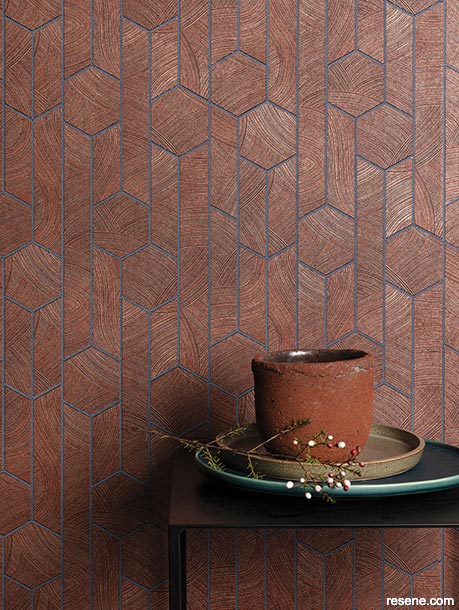
Resene Wallpaper Collection SUM106 is perfect for adding an attractive tile look to walls and ceilings when you’re faced with budget, timeline or structural constraints or your client wants ease of removal in the future.
Layer this design with accents in similarly coloured terracotta reds and browns like Resene Tuscany, Resene Trek and Resene Yogi for a warm and earthy look.
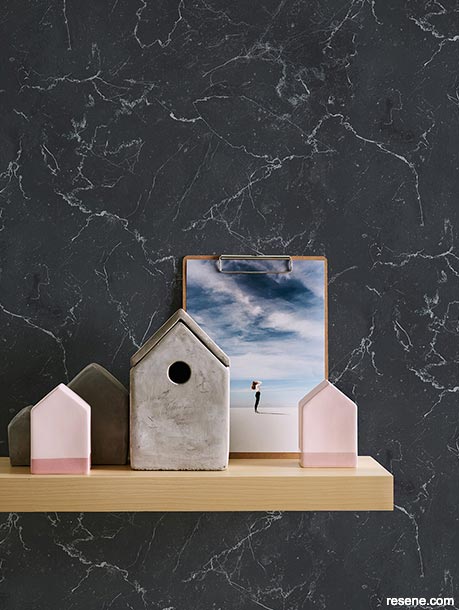
Resene Wallpaper Collection 37991-3 can be applied to walls, ceilings, doors, furniture, plinths and more to make these smooth, flat surfaces resemble black-coloured marble or granite.
If you want the wallpaper design to blend in with adjacent walls, opt for a softer black like Resene Black Sand or choose a truer black like Resene All Black if more contrast is needed.
We recommend that Resene products are always specified, applied and maintained in accordance with Resene’s data sheets and technical specifications. If you’re after something truly unique, make your Resene Representative your first port of call. They can offer recommendations on product options you might not have considered, have insight into other spaces where a similar look was achieved and can help come up with the correct combination to meet the performance demands of your particular project. They can also help connect you with a painter or artist in your area that specialises in bespoke paint effects to help you bring the vision for your project to life.






Design, fit-out and images: Urban Group
For more paint effect inspiration, visit www.resene.com/painteffects. And if you've produced an interesting, creative or unique effect on a finished project using Resene products, we'd love to see it. Send some images and tell us more about how you achieved it by emailing editor@blackwhitemag.com.
This is a magazine created for the industry, by the industry and with the industry – and a publication like this is only possible because of New Zealand and Australia's remarkably talented and loyal Resene specifiers and users.
If you have a project finished in Resene paints, wood stains or coatings, whether it is strikingly colourful, beautifully tonal, a haven of natural stained and clear finishes, wonderfully unique or anything in between, we'd love to see it and have the opportunity to showcase it. Submit your projects online or email editor@blackwhitemag.com. You're welcome to share as many projects as you would like, whenever it suits. We look forward to seeing what you've been busy creating.
Earn CPD reading this magazine – If you're a specifier, earn ADNZ or NZRAB CPD points by reading BlackWhite magazine. Once you've read an issue request your CPD points via the CPD portal for ADNZ (for NZ architectural designers) or NZRAB (for NZ architects).