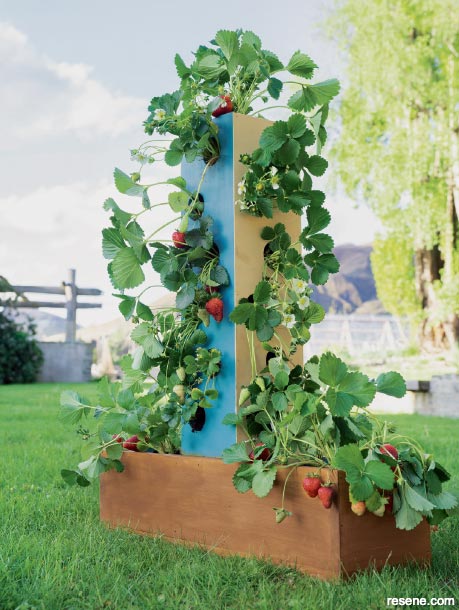
With some 200 seeds on its outer skin, strawberries technically belong to the rose family, not the berry. Even so, strawberries are rich in vitamin C, folate, niacin, dietary fibre and antioxidants. Did you know 10 strawberries contain more vitamin C than one orange?
I used Resene Calypso on the front and back of the strawberry tower and Resene Putty for the two sides. I used Resene Woodsman Natural for the planter-box base for a natural look.
There’s no sweeter reward than picking sun-warmed strawberries you’ve grown yourself, each one a tiny, mouth-watering treasure. Keeping the boys away from them until they are ripe is challenging work but, as I tell them, the payoff is in fruit that’s sweet, not sour.
This vertical planter, which can take 18 plants, prevents the fruit from rotting on the ground. When the season is over, use it for herbs, lettuce, kale and spinach.
Sunshine is the golden ticket to a great strawberry harvest. The more sun the fruits get, the sweeter they will be, so choose a sunny spot for your tower (shaded locations will promote leaves not fruit). Plant seedlings in free-draining soil with plenty of organic matter, and cover the top with a light layer of horticultural grit to prevent the soil from drying out. Feed with a fertiliser that has roughly the same potassium (K) ratio as nitrogen (N) – a liquid tomato fertiliser is ideal – then again once you see the fruit forming. Strawberries like moisture, so keep them well watered for a tasty summer crop.
Once ripe, it takes serious willpower to avoid eating them all at once. I like to reward the family’s ‘restraint’ with a picnic-worthy batch of Strawberry & white chocolate free-form cheesecakes.
You will need: a drill and 50mm hole-saw bit, a brad nailer and 30mm brad nails, exterior wood glue, 100-grit sandpaper and clamps. You’ll also need a quality potting mix (you can buy a specialist strawberry mix from garden centres) and up to 18 plants.
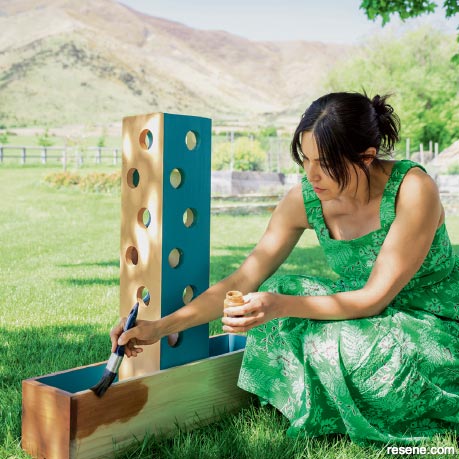
Step 1. Map out 18 staggered holes on three sides of the tower – one hole per strawberry plant. (This leaves the back to be placed against a fence or wall.) Drill each with a 50mm hole saw bit, and then sand down the sides and the holes.

Step 2: Before painting, undercoat the interior and exterior of the tower with Resene Quick Dry Waterborne Primer Undercoat. For a contrasted look, I painted two sides in two coats of Resene Putty – my lighter colour – before painting the other two sides in two coats of Resene Calypso.
Step 3: Once the paint has completely dried, assemble the tower, gluing the sides and attaching them with brad nails (this is easier done vertically).
Step 4: Glue the base pieces to the front and back of the tower, ensuring the tower is centred. (Position the base outside the tower, like it’s wrapping around it.) Attach with brad nails. For the sides of the base, cut panels to size, so they fit perfectly. Attach with brad nails. Measure the bottom of the base and cut two more panels to size, leaving a gap between the panels for drainage. Secure with brad nails.
Step 5: Finish off by painting the entire base with two coats of your Resene wood stain colour of choice; I went for a rustic look with Resene Woodsman Natural. Plant out the tower.
Fill up the tower with strawberry mix (from a garden centre) to the first hole. Push strawberry seedlings into the hole to rest on top of the soil. Then fill the tower to the next hole. Press this down to firm, adding more soil if necessary. Insert the next seedling and continue, adding soil and seedlings and pressing down until you get to the top of the planter. Plant out the base last.
February 2023
▸ Download a PDF of this article
Nadia's Journal
Articles, ideas and projects from Nadia's Journal in Resene weekend DIY.