Resene DIY project #3
How to paint like a professional - training videos and project sheets
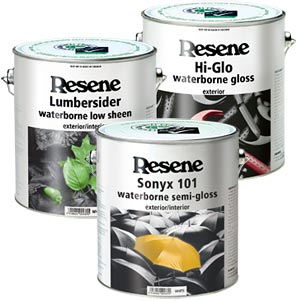
Painting weatherboards with Resene Hi-Glo, Resene Sonyx 101 or Resene Lumbersider
The application techniques and preparation requirements are essentially the same for our three premium exterior timber (weatherboard) paints. Resene Hi-Glo is a very high gloss finish and requires slightly more care when laying-off as its high gloss accentuates any imperfections. Resene Sonyx 101 is a semi-gloss finish and has the same durability and cleaning properties as Resene Hi-Glo. Resene Lumbersider is a satin finish and is very easy to apply.
| View video |

In winter we recommend the Resene Wintergrade versions of Resene Hi-Glo, Resene Sonyx 101 and Resene Lumbersider are used in place of the standard versions.
With the exception of new weatherboards treat moss and mould with Resene Mould & Moss Killer (see Data Sheet D80) – this is best applied using a knapsack garden sprayer. Care should be taken to avoid plants etc.
Scrub old and degraded weatherboards using Resene Paint Prep and House Wash (see Data Sheet D812) and a hard bristled scrubbing brush to dechalk (old degraded paint) and remove mould residue, flaked paint and other surface contaminants.
If the timber is new and not already primed, wash it with Resene Paint Prep and Housewash to condition the timber (so the primer will adhere better) and remove any surface contamination, fingermarks etc. Do not waterblast as this will gouge and damage the timber.
With the notable exception of Resene True-Prime the manufacturers of the primers used to pre-prime timber in Australia and New Zealand require that the timber is sanded and primed with an solventborne primer, such as Resene Wood Primer (see Data Sheet D40). Pre-primers are thin, holding primers and only designed to provide temporary protection during the building process. They should not be considered part of the coating system.
Unfortunately most are so poorly bound together that unless the primer is sanded off completely a solventborne primer (as opposed to a waterborne primer like Resene Quick Dry (see Data Sheet D45) will be needed to help stabilise the pre-primer and ensure a good base for future topcoats. Most paint failures on new exterior timber are due to the poor quality of these pre-primers.
As noted the exception is Resene True-Prime which was developed specifically to overcome the issue identified above. It is blue in colour but unfortunately this has been copied, so the only true indicator is if the required identification sticker has been left on site.
Scrape and sand any flaked or unsound paint using 80 to 150 grit zinc sterate sandpaper depending on the degree of flaking. A linbide scraper or 35mm to 50mm flat bladed scraper may also be needed.
Prime bare timber and/or sanded areas with Resene Quick Dry Primer or Resene Wood Primer if the timber is Cedar or Redwood or particularly degraded. Always prime sanded areas the same day to avoid dew settling and lifting the edges overnight.
Stir the paint thoroughly using a flat bladed stirrer and decant from larger pails into smaller more manageable containers, such as the Resene Paint pot. If hot and dry or very windy add Resene Hot Weather Additive to improve the flow of the paint. The key to a top quality finish is to use a high quality brush, such as a PAL Legend in a size that you are comfortable with – also try and match the size of the brush to the weatherboard profile. Typically we recommend the 75mm or 88mm PAL Legend brush. If priming with Resene Wood Primer it is useful to have a second smaller brush to avoid any issues when changing from waterborne to solventborne products.
Ensure surfaces such as decks and window frames are protected using drop sheets and masking tape.
Please take the time to carefully read through the instructions on the label. More information including Data Sheets and Safety Data Sheet/s (SDS) can be found on the Resene website.
When painting weatherboards it is important to plan your approach.
Before starting load the brush with paint.
Tap the excess paint off into the paint pot and wipe one side of the brush on its edge – this makes cutting-in easier.
Start from the side and paint from the top of the wall downwards – working towards and around logical breaks, such as windows, doorways and downpipes.
Paint the underside of each weatherboard first then apply the paint to the face of the weatherboard.
For the first coat a cross hatch technique may be needed to get sufficient paint on the boards before laying-off with the brush.
The key to a professional finish is to maintain the wet edge of the paint as you progress along the weatherboards and down the wall. Always look to complete the length of each weatherboard and avoid stopping and starting part way through a board.
Paint one or two weatherboards at a time and always paint in the same direction.
Once dry, usually after three to four hours apply a second coat. While the application is the same the second coat of paint will generally apply more easily.
Try not to paint too late in the day to avoid dew settling on and marking the paint.
Window scribers can be painted or touched up after the weatherboards.
Resene CoolColour™ technology is available in many exterior Resene finishes, including Resene Hi-Glo, Resene Sonyx 101 and Resene Lumbersider, in a wide range of colours. Formulated with special pigment technology, a Resene CoolColour will reflect more heat than a standard colour, reducing the stress on the coating, substrate and building, keeping them cooler.
› Download this project sheet as a PDF
Training Videos and Project Sheets
Learn how to prepare surfaces and apply paint to get the best from your paint finish with these handy videos and project sheets.