From the Resene decorating blog
Trim features in your home – or on the outside – such as windows and door frames are often the last part of the reno to get attention.
They’re also often the aspects of your design that pull the look together and make your colour choices really pop. They’re also among the hardest working parts of your home, prone to knocks, wear and tear, and, of course, the weather.
Here are some tips from Resene for painting trim areas like window frames, inside and out.
How you prepare your window frames and sills for painting will depend on whether you are painting newly installed wooden joinery or repainting older surfaces.
For new interior surfaces the preparation process is relatively simple. First, remove any hardware such as latches and fill nail holes with wood filler and allow to try before lightly sanding. Wipe down the surface and mask the frame to avoid paint splashes on the windows or the surrounding walls.
Apply a coat of Resene Quick Dry primer and allow it to dry for a couple of hours. Finally, paint the wood surfaces with two coats of your chosen topcoat colour.
For older wooden window frames, inside or out, that are being repainted, a little more preparation is required. Remove any hardware and start by treating any moss and mould using Resene Moss & Mould Killer, then clean the surface with Resene Paint Prep and Housewash. Sand away any old flaking or peeling paint or fully strip the surface if it is in poor condition.
Treat any stripped areas with Resene TimberLock, then fill any nail holes with wood filler, sand and wipe down. At this point you could also add a coat of Resene Timber Surface Prep to give your topcoat a smoother finish. Once dry, paint the surface with a coat of Resene Quick Dry primer. When that is dry, paint with two coats of your chosen topcoat colour.
This same process can be used on other trim areas ready for repainting such as doors, and door frames.
Top tip: If older wood putty is decaying, remove it and replace with a synthetic putty as it can be painted over within 24 hours.
If you have areas of decayed wood, you may need to use Repaircare to fix them before painting. Check with Resene ColorShop staff what is recommended for your project.
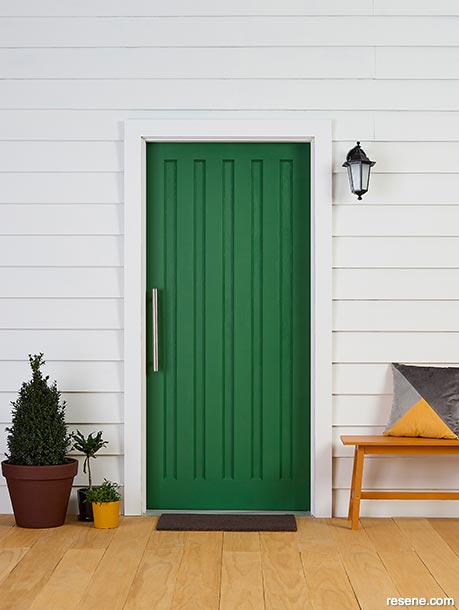
This Resene Parsley painted door looks lush and sophisticated against weatherboards and a door frame in Resene Merino.
The bench in Resene Moroccan Spice and deck in Resene Woodsman Natural warm and soften the look. Pots in Resene Digeridoo, Resene All Black and Resene Pirate Gold and doormat in Resene Felix. Cushion from Resene Living collection from Briscoes, lights from Lighting Plus. Project by Sarah Kolver and Emma Rawson, image by Bryce Carleton.
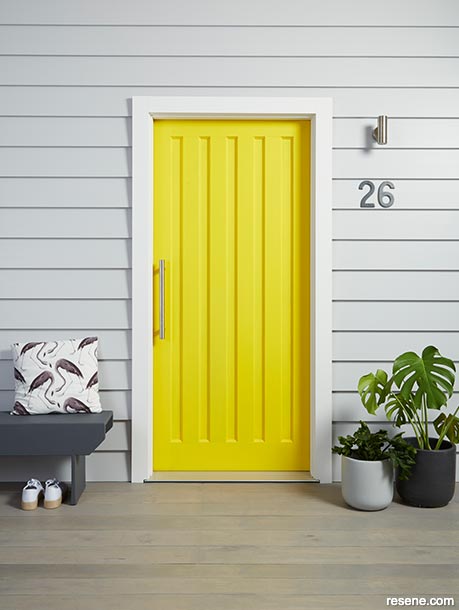
Resene Turbo gives this front door just the boost it needs to be an eye-catching entrance.
The exterior weatherboards are painted in Resene Triple Concrete. Door trim in Resene Black White, bench in Resene Tuna, pots in, from left, Resene Silver Chalice and Resene Nocturnal, house number in Resene Silver Chalice and doormat pattern in Resene Tuna. Door from Corinthian Doors, lighting from Lighting Direct, cushion by Nes Design. Project by Vanessa Nouwens, image by Bryce Carleton.
The most popular finish for most window joinery is Resene Lustacryl semi-gloss waterborne enamel because it will perform well in all conditions, including exterior, but is also a lower sheen so will be better at hiding surface imperfections. It’s also a good choice for other trim areas such as architraves, and skirtings.
On interior doors use Resene Lustacryl with a semi-gloss finish for a subtle contrast if you’ve used low sheen or matt on your walls.
If you prefer a glossier finish, especially on areas like your front door to make your door colour pop, use Resene Enamacryl gloss waterborne enamel. A glossier finish is easier to wipe clean, while a semi-gloss finish will help to hide surface imperfections more than a glossier finish.
Top tip: On exterior surfaces consider using the Resene CoolColour version of your colour, particularly if using darker colours. This will protect both your paint and the substrate from the sun’s heat.
Did you know you can also paint over aluminium joinery too? First clean down the joinery using Resene Paint Prep and Housewash following label directions, then prime and topcoat. You can topcoat in a waterborne enamel or a two pack finish, depending on what you are comfortable painting with and the finish you’re after. Check with Resene ColorShop staff for advice for your project.
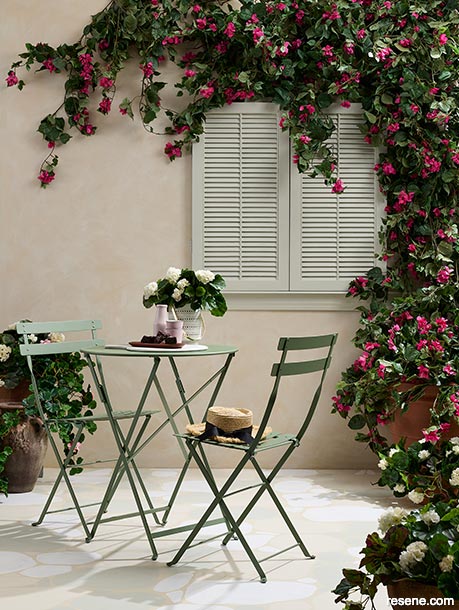
This Mediterranean-style courtyard adds makes this front porch seem very inviting.
It’s achieved with the illusion of limestone walls using Resene FX Paint Effects Medium with layers of Resene Half Canterbury Clay, Resene Eighth Canterbury Clay and Resene Double Spanish White. Shutters and windowsill in Resene Kangaroo, faux cobbled patio is painted in Resene Half Canterbury Clay, Resene Eighth Canterbury Clay, Resene Double Spanish White, Resene Blanc and Resene Half Spanish White and large pot in Resene FX Faux Rust Effect. Project by Annick Larkin, image by Bryce Carleton.
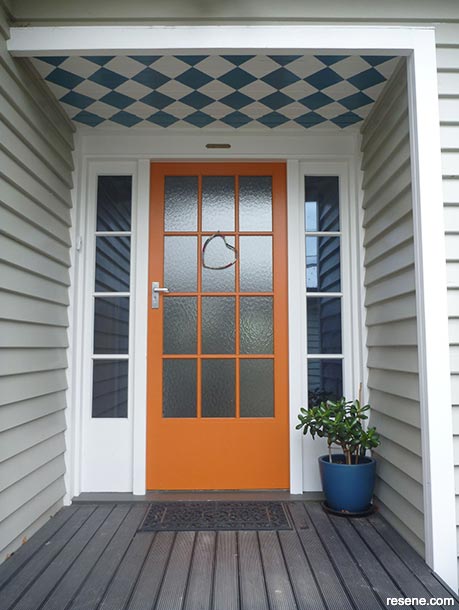
This front door is painted in striking Resene Clockwork Orange with surrounding trim in Resene Quarter Thorndon Cream.
The weatherboards are in Resene Triple Ash and the creative harlequin ceiling uses Resene Bismark to create a geometric pattern. Project and image by Fleur Thorpe.
Finishing your room with beautiful stained wooden window frames is a beautiful way to showcase not only the wood finish but also your chosen colour scheme.
Just as with painting your window trims the amount of preparation required to stain the surfaces will depend on the condition of the wood.
For new wood remove the latches and sand the surface using a fine sandpaper to remove any imperfections or loose fibres. Wipe down and mask the window and surrounding walls. You can apply a polyurethane such as Resene Qristal Clear or Resene Aquaclear direct or enhance or refresh your timber’s colour first with Resene Colorwood wood stain, then apply the polyurethane. Resene Qristal Clear polyurethane works best with richer timbers and will tend to yellow over time. Resene Aquaclear is better for light timbers and won’t yellow as it ages. Be aware though that timber will change colour over time, so your timber may start quite white and slowly change to more yellow tones. If you find over time the timber is too yellow, you can use finishes like Resene Colorwood Whitewash or the Resene I Speak Beach collection of Resene Colorwood colourwash stain finishes to adjust the colour without the need to sand back.
To stain older surfaces treat with Resene Moss & Mould Killer if required and wash the surface down with Resene Timber and Deck Wash. Sand the surface with a fine grain sandpaper or strip old paint or stain from the surface. Then stain and polyurethane.
Top tip: Dark stains may help disguise discoloured areas common in aged weathered timber.
Exterior timber is best finished in a stain from the Resene Woodsman range. Avoid using clear finishes outside on timber as they do not provide enough protection to the timber and will end up flaking as the timber deteriorates.
Popular colours: Some of Resene’s most popular colours for windows and other trim areas are neutrals such as fresh white Resene Alabaster or the slightly beige-hued Resene Quarter Tea. All of these popular whites and neutrals can be used in eighth, quarter, half, double or even triple strengths, which can work quite differently against your main colour. It’s worth experimenting with Resene Testpots to see the difference.
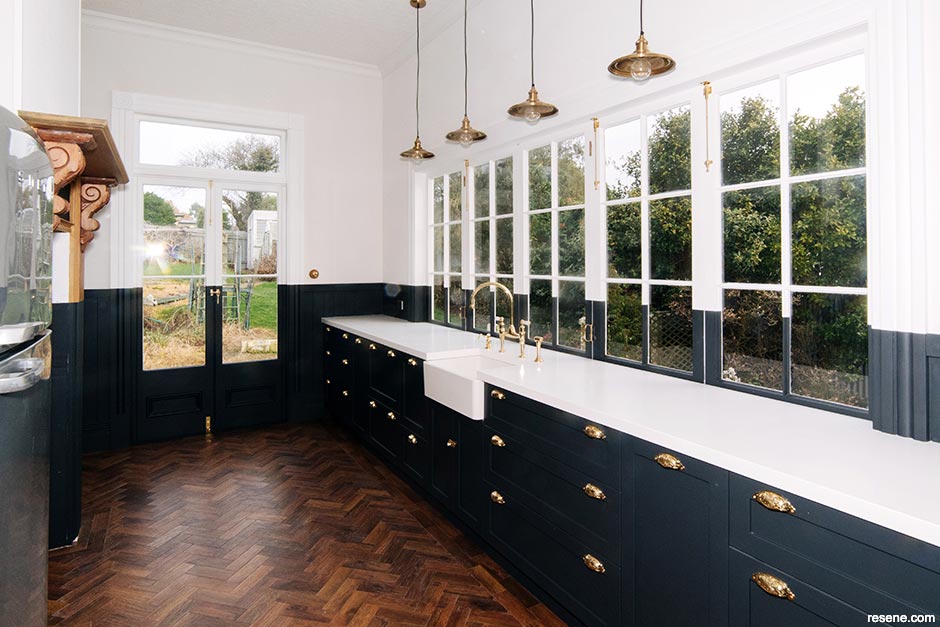
Bold contrast: There is an increasing trend toward bolder window trims in blacks, charcoals and even deep blues. Try Resene Midnight Express against interior or exterior walls in icy blue hued white Resene Zircon. For a dramatic monochrome try Resene All Black window frames against walls in soft grey blue Resene Freestyling.
Tonal trims: Instead of dramatic contrast between your trim and main wall colour, opt for graduated tonal shades. Paint your windows in a colour strength that is one or two steps higher or lower than your walls. Resene Tea is a great neutral to play with here. Try walls in Resene Half Tea with trim in Resene Double Tea.
Wood for warmth: Using natural wood finishes on trim features of your home can add immediate warmth to otherwise cool shades. An unexpected but sophisticated combination to try is Resene Colorwood Natural for interiors or Resene Woodsman Natural for exteriors with a cool toned grey such as Resene Transmission. Highlights of white in Resene Black White add extra brightness. Just note that your finished stain will vary depending on the wood you are working with, so test first.
Dramatic entrance: Enhance your finished trim at your entrance way by painting your front door in a bold colour. On-trend wine reds such as Resene Cab Sav are a stylish choice, particularly against greyed whites like Resene Sea Fog. Go for eye-catching bright orange Resene Outrageous which looks particularly dramatic against dark Resene Licorice or creamy Resene Quarter Spanish White.
Colours used inside usually appear darker and more intense than you might expect, so it’s often best to opt for a lighter colour. The opposite applies outside. The bright sun makes colours appears lighter so make sure you allow for enough contrast between colours and if you are planning light finishes, consider choosing the darkest of your preferred options, as it will look lighter once you have applied it. Try your colours out using Resene testpots painted onto large card leaving an unpainted border around the edge. Make sure you apply two coats to see the true colour. Once dry, move it around your home’s exterior at different times of the day to see how it looks.
June 28, 2022
Visit your Resene ColorShop for advice and everything you need to paint your windows and trims. If you have a tricky surface to paint, the Resene ColorShop staff can assist or use the free Ask a Resene Paint Expert service.
Book a colour consult | Ask a Colour Expert | Ask a Paint Expert
Resene's decorating blog
Paint your home beautiful! Discover the latest decorating trends, tips and colour news.
![]()
Previous «
Whites & neutrals 101
![]()
Blog home
View the latest trends, tips and news
![]()
» Next
Pro paint finishes
![]() Get inspired ! Subscribe
Get inspired ! Subscribe ![]() Get saving ! Apply for a DIY card
Get saving ! Apply for a DIY card
![]()
Can't find what you're looking for? Ask us!
Company profile | Terms | Privacy policy | Quality and environmental policy | Health and safety policy
Colours shown on this website are a representation only. Please refer to the actual paint or product sample. Resene colour charts, testpots and samples are available for ordering online. See measurements/conversions for more details on how electronic colour values are achieved.
What's new | Specifiers | Painters | DIYers | Artists | Kids | Sitemap | Home | TOP ⇧