Craft with Resene, from the Australian Women's Weekly
Create a display of gorgeous handpainted eggs for your home this Easter.
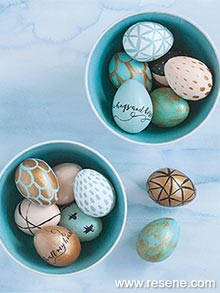
Resene has a gorgeous range of shimmering colours in their innovative range of Metallics and Special Effects. These are perfect for craft projects such as this one, when you want to add a touch of glam to your creation.
“Don't be afraid to experiment because that's half the fun!"
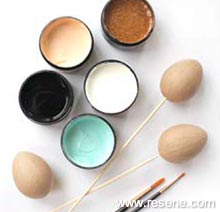
To make it easier to paint your eggs, push a wooden skewer into the base of each egg and use this to hold the egg while you paint it. To stand the egg up for drying, push the other end of the skewer into an old cardboard box or lump of polystyrene.
When choosing your Resene paint colours, make sure you have a range of contrasting shades so your patterns make a bold statement. Colour combinations are up to you and what works with your decor, but don’t be afraid to experiment because that’s half the fun!
For all the designs, start by applying a basecoat of Resene colour to each egg, then set aside to dry. Once dry, apply a second coat for a nice even finish.
The next step is to embellish your eggs with a variety of designs – you can do anything from dots and dashes to stripes and crosses and inspiring words. The options are endless, but here are a few ideas to get you started.
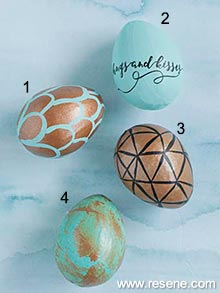
1. Protea Print
Use Resene Bullion as the base colour and Resene Aqua for the protea pattern. To make the protea pattern, use a fine brush and start at the base of the egg (see pic A). Paint even-sized curves that start and end up at the centrally placed skewer. Start the next row by making another arch that joins two of the base shapes (see pic B). Continue this arch pattern until you reach the top of the egg. (On another egg you could try reversing out the colours using the same pattern.)
Protea print - pic A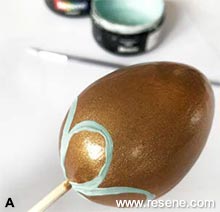
Protea print - pic B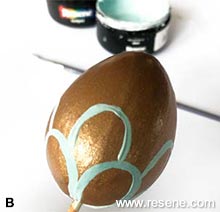
2. A way with words
There are so many words and sayings you can use for this incredibly simple but effective design. Paint your egg in a light colour, such as Resene Aqua or Resene Romantic. Leave to dry. Then use a fine paintbrush to paint on your message with Resene Black, or apply black rub-on lettering.


3. Triangles
To make a geometric pattern like this one, paint your egg with two coats of its base colour and leave to dry. Using a fine paintbrush and contrast colour, cover the egg with adjoining triangles – you can start anywhere and the triangles don’t have to be the same size. We made this with Resene Black on a Resene Bullion base and also with Resene Aqua on Resene White.
4. Vintage vibe
For an antique-style finish, use Resene Aqua or Romantic as your base colour. Once dried, dip a dry sponge into Resene Bullion and stamp it randomly over the egg to create a stippled effect. If there is too much paint, continue to dab with clean areas of the sponge. (Screwed up paper towels also work well.)
When all eggs are completed and dry, coat each one with Resene Art Action Clear Glaze gloss, so they can be wiped clean and will last for many seasons to come.
Project by Marsha Smith, March 2018
Projects from the Australian Women's Weekly
View more project ideas from The Australian Women's Weekly magazine in the Resene weekend craft projects section.