Craft with Resene, from the Australian Women's Weekly
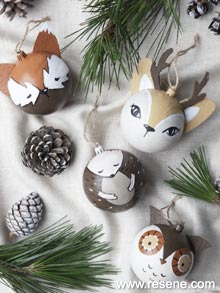
Personalise your tree this year with adorable homemade woodland characters. Marsha Smith used Resene paints to create these four cuties.
Selection of Resene testpot colours:
Resene Black, Resene Cola, Resene Peru Tan, Resene Twine, Resene Squirrel, Resene Wafer, Resene Quarter Sisal, Resene Quarter Black White.
Give baubles a light sand to remove any dirt and roughen up slippery surfaces. This will help the paint adhere well.
Rotate baubles so the “seam” forms the side of each creature’s head. Use a pencil to divide the “face” of each bauble into four parts (see dotted lines on drawings below).
Using the drawings as a guide, pencil in curved lines to mark the forehead of the deer, owl and fox and the face of the hedgehog. The lines all come from the “seam” to nearly the centre of the bauble.
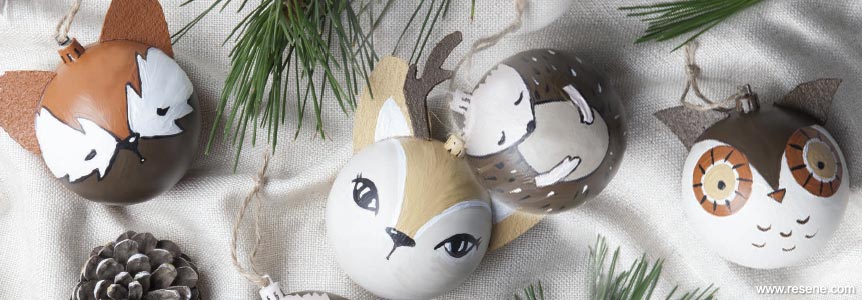
Once your characters have been drawn on, it’s time to paint. To stop the baubles from rolling around the table while the paint dries, cut round segments from your toilet roll – these make the perfect place for the baubles to rest securely.
Following the paint colour guide, start by painting the brow arch using the Resene colour shown. Next, paint the bulk of the face. When this is dry, use the same colour to paint the back of the bauble. Note: Two coats of paint are needed for the best coverage.
Once the main colours and shapes are completed and dry, use Resene Black and a very fine paintbrush to paint in eyes, nose, mouth and the hedgehog’s spikes. Small details and textures, like the white highlights in the eyes and and spikes on the hedgehog, are all painted last.
To make ears and the deer’s antlers, paint the cork sheet in the required Resene colours, allow to dry, then pencil on the shape of the ears and antlers. Cut out with scissors and glue on using a hot glue gun.
Finally, brush baubles with Resene Art Action Clear Glaze gloss, if you want a glossier look, and when this is dry, attach a piece of twine to form a loop for hanging your creations on the Christmas tree.
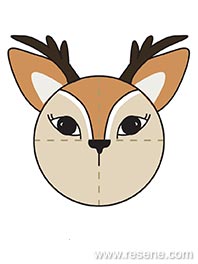
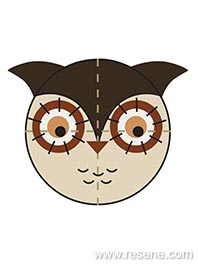
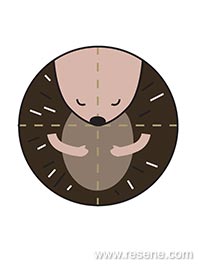
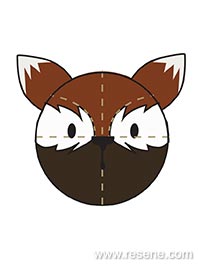
Use these drawings as a reference for the placement of eyes, noses and other features. The guide lines should help you achieve the correct proportions. If you like, you can photocopy and enlarge them to the right size, which may help with your drawing. Another option is to rub pencil over the back of your photocopy, then place the paper pencil-side down on top of the bauble. Firmly draw over the lines marking eyes and nose etc to get an imprint on your bauble.
Project by Marsha Smith, April 2018
Projects from the Australian Women's Weekly
View more project ideas from The Australian Women's Weekly magazine in the Resene weekend craft projects section.
![]() Get inspired ! Subscribe
Get inspired ! Subscribe ![]() Get saving ! Apply for a DIY card
Get saving ! Apply for a DIY card
![]()
Can't find what you're looking for? Ask us!
Company profile | Terms | Privacy policy | Quality and environmental policy | Health and safety policy
Colours shown on this website are a representation only. Please refer to the actual paint or product sample. Resene colour charts, testpots and samples are available for ordering online. See measurements/conversions for more details on how electronic colour values are achieved.
What's new | Specifiers | Painters | DIYers | Artists | Kids | Sitemap | Home | TOP ⇧

