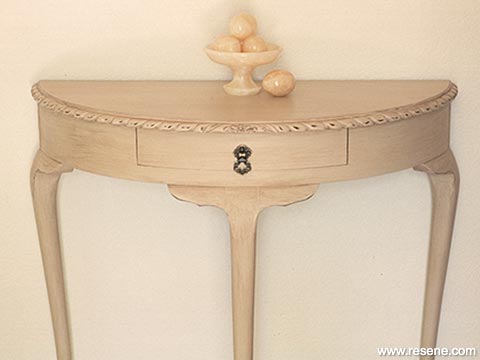
Resene paint effects projects, project 09
Antiquing is a finishing technique that darkens the paint colour and gives the surface an instant aged look.
There are a number of ways to achieve this look depending on whether you prefer to use waterborne or solventborne products, waxes or simply thinned paint or an effects finish.
Some stains or varnishes leach through paints so do a test patch first and if necessary apply an appropriate sealer before the topcoat is applied.
Before you start your project, try out different combinations and practice your application method on a piece of card until you are happy with the result.
Step 1
Step 2
Step 3
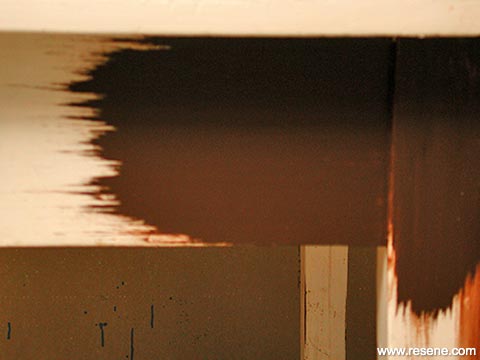
Step 1: Remove any fittings or handles and sand smooth with 120 – 220 grit sandpaper. Apply an even coat of Resene Dark Rum, painting with the grain of the wood. Omit this step if you don’t want to rub the edges back to give a worn, distressed look later. You could put a sealer or undercoat on at this stage instead.
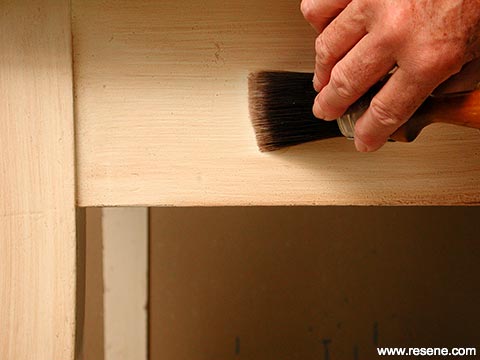
Sand lightly with fine sandpaper, dust down and apply two coats of Resene Double Spanish White in the direction of the wood grain. Allow to thoroughly dry.
Step 2: Mix equal parts of Resene Irish Coffee and water or Resene FX Paint Effects Medium.
When antiquing do one section, or surface, of the furniture at a time. The antiquing medium dries quickly so you don’t want to get too far ahead of yourself and find you cannot wipe back all that you intended to.
If it’s a cabinet with drawers, do all the drawers together. This way they will have a uniform look. Check them in the cabinet to make sure the antiquing is an even colour all over before you apply any sealer.
Apply a thin wash, remembering you are artificially applying dirt, so make sure it gets into the crevices where dirt would have accumulated.
Brush the wash thinly over the surface and leave the brushstrokes showing or fold a soft cloth into a pad and wipe gently over the surface to soften the look.
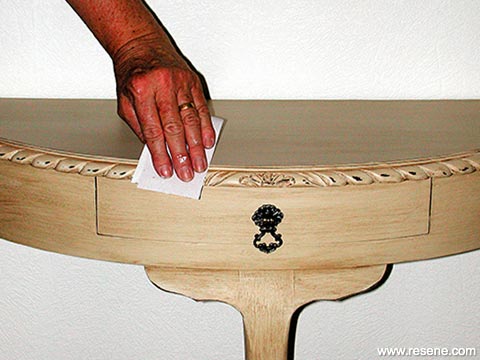
Step 3: If you wish to distress the edges, gently sand the raised areas or edges with 320-400 grit sandpaper to reveal the brown basecoat. Only do the areas that would have been worn with use or rubbing had the item been an actual antique.
Leave as is or seal with two to three coats of Resene Aquaclear to protect the surface and make it more durable.
› Download this project as a PDF
Project by Janet Scard. Photography by Joseph Zou.
![]() Get inspired ! Subscribe
Get inspired ! Subscribe ![]() Get saving ! Apply for a DIY card
Get saving ! Apply for a DIY card
![]()
Can't find what you're looking for? Ask us!
Company profile | Terms | Privacy policy | Quality and environmental policy | Health and safety policy
Colours shown on this website are a representation only. Please refer to the actual paint or product sample. Resene colour charts, testpots and samples are available for ordering online. See measurements/conversions for more details on how electronic colour values are achieved.
What's new | Specifiers | Painters | DIYers | Artists | Kids | Sitemap | Home | TOP ⇧


