From habitat magazine - issue 36, TradieGal tutorial
In the first of a series of TradieGal Tutorials, professional painter and decorator Tegan Williams reveals her pro tricks to painting kitchen cabinetry.

2021 NAWIC Tradeswoman of the Year Tegan Williams is currently renovating a villa in Featherston. The weatherboards, balustrades and posts are painted in Resene Lumbersider waterborne low sheen paint, tinted to Resene Blanc with balcony rail and fretwork trim in Resene Zinzan.
If you know me from Instagram, you’ll know me as TradieGal. If you’ve met me in real life you’ll know me as Tegan, a 28-year-old painter/decorator living in Featherston, the small, beautiful South Wairarapa town.
Homes in Featherston are often beautiful old villas, cottages and the occasional new home. My partner and I were lucky enough to get into the really ‘slim’ rental market, and luckier still our landlords have no problem letting us make our villa our home. They gave us free rein to paint what we wanted and being a painter/ decorator, I was keen to get stuck in.
When we moved in, the home’s interior was in a very dated-looking shade of yellow, ceilings included. The first thing I did was to paint the ceilings with Resene Quarter Black White. This opened up the space and allowed light to bounce around. It’s amazing what a difference a freshly coated ceiling makes.
It’s important to make a space feel like your own, so next on the list was painting a feature wall in the master bedroom in an eye-catching dark-aubergine shade called Resene Chapta And Verse. It gives the room a point of interest and personality. After that, we gave the kitchen a bit of a tidy-up by painting the kitchen cabinetry. Completing these jobs makes this house a home, and I got the same feeling as when I finish a house in my professional life. I’m not just painting four walls; I’m painting someone’s home and creating a space they’re going to enjoy and look at every day.
When I start any repainting job, I begin by setting it up correctly. I clear the area of clutter, cover it with drop cloths and give the paintwork a good wash with Resene Paint Prep and Housewash to remove any grime. I then mask out any areas with masking tape. I like to use masking tape on small areas such as kitchen cabinets or masking tape and paper on bigger jobs so that my paintbrush or roller doesn’t accidentally hit anything I don’t want to paint. These kitchen cupboards were in relatively good condition – they were just a couple of paint coats shy of completion.
Step 1
Step 2
Step 3
Step 1: Since these cupboards were in good nick, the first thing I did was sand down the surface. For this cupboard, I used 150-grit sandpaper to buff it up by hand to allow the paint to stick well. Wipe away sanding dust with a clean, dry cloth.
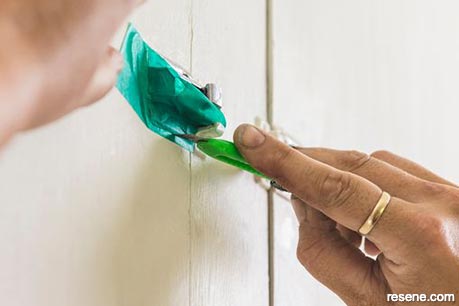
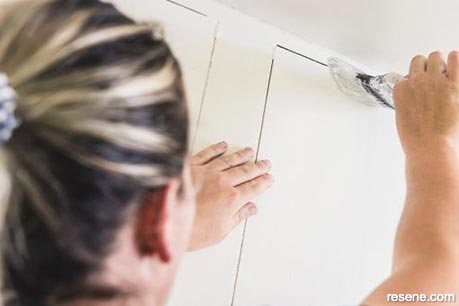
Step 2: I masked out the small handles to ensure I didn’t get any paint on them. The technique I prefer is called over-masking, where I cover the tape over the edge and press it in around the sides and cut off any excess with a sharp craft knife.
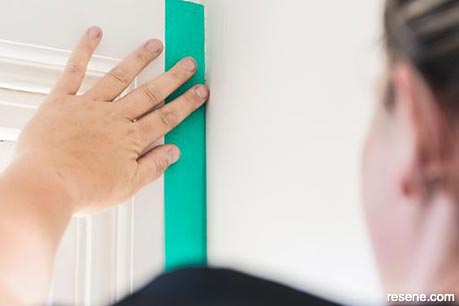
Step 3: I then masked out the edge of the window frame since the colour of the cabinets and the windows were different. As this area gets a lot of use, I knew I’d see that line every day and wanted it as sharp as possible.
Step 4
Step 5a
Step 5b
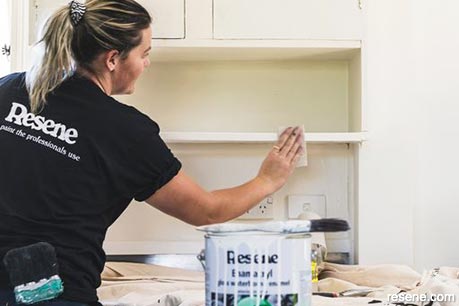
Step 4: I used a new brush to paint the cabinets, using Resene Enamacryl tinted to Resene Quarter Black White. This is a waterborne gloss enamel which is fast-drying and allows me to do a same-day recoat. It is hard-wearing like oil-based paints used to be, but better for the environment. It’s great for high-use areas and easy to wipe down without leaving any wipe marks. I applied the paint using a brush instead of a roller to maintain the home’s character, which would have originally been painted with a brush. The result didn’t look too ‘new’ but is still professional-looking.
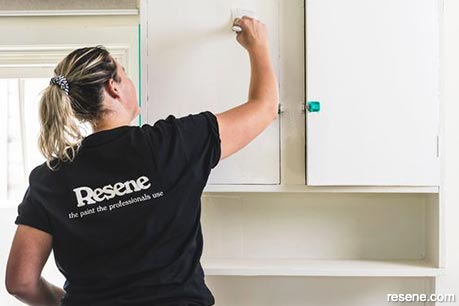
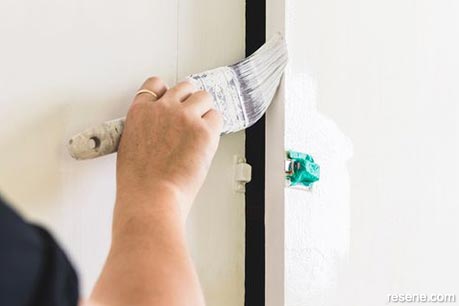
Step 5: I started by cutting in the ceiling and edges to give myself a buffer space for later when painting the main cabinets. When cutting in, I like to hold my brush on the side using the bristles on the top edge to follow the line of the wall. Next, I cut in around the handles, hinges and inside edge before painting the entire face of the cabinets.
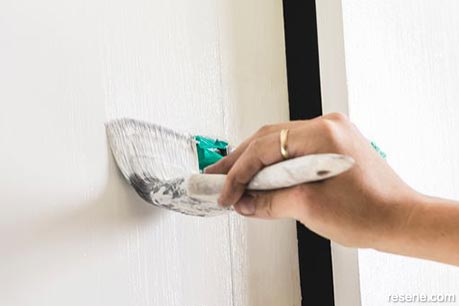
Step 6: For the main areas, I used a 63mm flat brush. I dipped one-half of the length of the bristles into the paint container and gave the brush a tap against the side of the paint pot to remove any excess. I held the paintbrush at about a 45-degree angle, working with my wrist to apply long brushstrokes for even paint coverage. To finish, I ‘laid it off’. I used a semi-dry brush (I used my existing brush, but didn't add more paint) and brushed with a smooth motion from the top to the bottom. Laying-off the paint is a term we use to give a smooth finish and hide brushstrokes.
Step 6
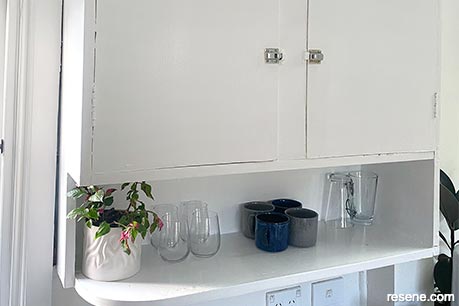
Finished project

Tegan Williams
New timber or melamine cabinetry requires priming before painting. Resene Waterborne Smooth Surface Sealer is ideal for priming melamine or laminated surfaces, while Resene Quick Dry is a good option for priming most timber. If you are unsure about what’s suitable for the job, ask the experts at your local Resene ColorShop.
I separated the cabinet into two sections – doors and the shelf. This helps maintain a ‘wet edge’ while painting and minimises the risk of lap marks or ‘fat edges’ where there is build-up of paint. Lap marks and stripes appear when dry paint and wet paint overlap. Always make sure your painting edge is wet and doesn’t dry before you finish the job.
People often ask me why I decant paint from a paint bucket into a Resene paint pot instead of dipping the brush directly into the paint bucket. I do this because the paint buckets are heavy to carry around but also Resene’s lip-less paint pots prevent paint from being caught in the lip. A paint pot will last me six months. It also keeps the paint in your original paint can fresh which will help it last longer if you are storing it for any touch-ups or other projects later.
For more TradieGal Tutorials visit www.habitatbyresene.com/tradiegaltutorials. Follow Tegan on Instagram at @tradiegal.
Words: Tegan Williams
Images: Mike Heydon, Tegan Williams
Search habitat magazine stories
Printed copies of habitat highlights are available from late March 2024 at Resene ColorShops and resellers, while stocks last. You can view back issues of habitat magazine online.
Specifiers:
If you have an idea, project or story that you think would suit habitat, we’d love to hear from you. Please drop us an email with your details and include photos if submitting a project.
Sign up for a DIY card and Save! Australia | New Zealand
![]() Get inspired ! Subscribe
Get inspired ! Subscribe ![]() Get saving ! Apply for a DIY card
Get saving ! Apply for a DIY card
![]()
Can't find what you're looking for? Ask us!
Company profile | Terms | Privacy policy | Quality and environmental policy | Health and safety policy
Colours shown on this website are a representation only. Please refer to the actual paint or product sample. Resene colour charts, testpots and samples are available for ordering online. See measurements/conversions for more details on how electronic colour values are achieved.
What's new | Specifiers | Painters | DIYers | Artists | Kids | Sitemap | Home | TOP ⇧


