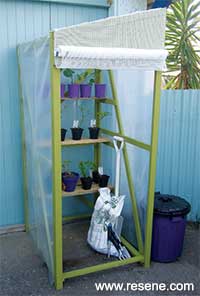
Mark Rayner comes up with a simple, compact solution for sheltering plants.
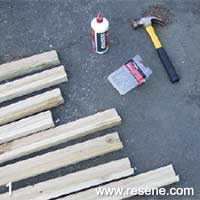
You will need: Approximately 40m of 25mm x 50mm treated battening, three 1.8m lengths of fence paling, a piece of 22mm treated plywood, approx. 750mm x 250mm, clear PVC plastic sheeting, shade cloth, exterior PVA glue, 40mm galvanised nails, saw, hammer, set square, tape measure, paintbrush, 19mm galvanised staples and two galvanised hanging brackets. Resene Quick Dry waterborne primer undercoat, Resene Lumbersider tinted to Resene Highball.
Top tip: Use a set square when building the frame to ensure wood is fixed at the correct angle.
![]()
Step 1
Measure and cut four 2m lengths and four 1.8m lengths of battening. Fix at right-angles with PVA and nails to create four rigid corner posts.
Step 2
Fix four one metre lengths of battening at right angles to create each rigid 'top' and 'bottom' support. Fix to the corner 'posts', as shown, to create a side wall frame. Fix the remaining one metre length 900mm from the bottom edge. Repeat for the second wall.

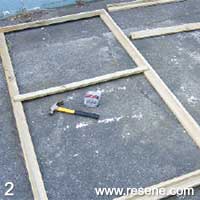
Step 3
Measure and cut five 750mm lengths of battening and use to join side walls together, as shown, fixing at top and bottom with PVA glue and nails. Cut and fix two angled braces along the back wall.
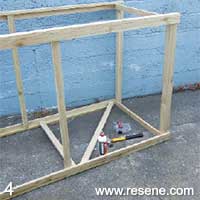
Step 4
Fix two angled braces along each of the side walls, as shown.
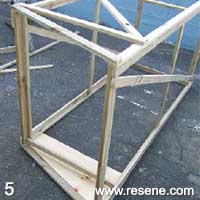
Step 5
Cut two angled pieces of battening to fit across the roof pitch. Cut an angled piece of plywood to fit across the front panel’s top to help to keep this panel rigid and square. Cut supports for the shelves and fix to side panels approximately 400mm apart.
Step 6
Prime the frame with one coat of Resene Quick Dry allowing two hours to dry.
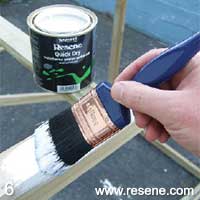
Step 7
Paint the frame with two coats of Resene Highball. Allow each coat two hours to dry.
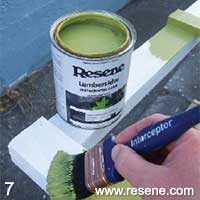
Step 8
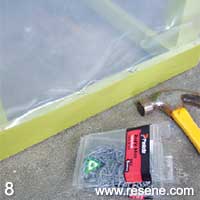
Staple PVC to the frame. Cut shade cloth to fit the front opening and staple at the top. Fix a length of battening to the bottom of the shade cloth. Attach two hanging brackets to hold the rolled shade cloth. Cut shelving from fence palings.
![]() Get inspired ! Subscribe
Get inspired ! Subscribe ![]() Get saving ! Apply for a DIY card
Get saving ! Apply for a DIY card
![]()
Can't find what you're looking for? Ask us!
Company profile | Terms | Privacy policy | Quality and environmental policy | Health and safety policy
Colours shown on this website are a representation only. Please refer to the actual paint or product sample. Resene colour charts, testpots and samples are available for ordering online. See measurements/conversions for more details on how electronic colour values are achieved.
What's new | Specifiers | Painters | DIYers | Artists | Kids | Sitemap | Home | TOP ⇧