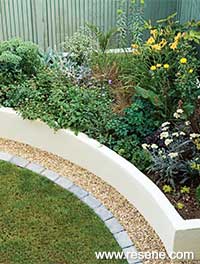
A step-by-step guide to making a stylish flower garden.
You will need:
Tools: A plate compactor, electric concrete mixer, wheelbarrow, shovel, rake, string, wooden pegs, pole or broom handle, pointing trowel, spirit level, bolster chisel, rubber mallet, plastering trowel, hammer, and a foam or sponge paintbrush.
![]()
 Step one
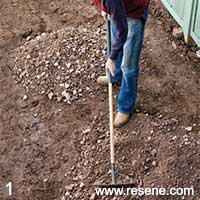
Clear and level the site for your raised bed, then spread a layer of basecourse. Make sure it’s about 8cm deep over the entire area.
 Step two
Compact the basecourse using the plate compactor to a uniform dense condition. This will ensure the footings for the bed are more secure.
 Step three
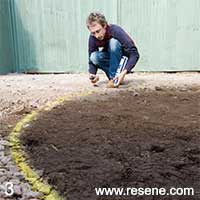
Using line-marking spray paint, mark out the shape of the bed. For straight lines, tie a piece of string to two wooden pegs, secure the pegs in the ground, pulling the string taut, then spray along the string. For curves, tie another piece of string to a pole or broom handle. Push the pole into the ground at a point equidistant from each end of the curve. Pull the string taut and mark where it meets one end of the curve. With the spray can and string in hand, walk the curve, keeping the string pulled tight, and spray. Leave the pole and marked string in place.
 Step four
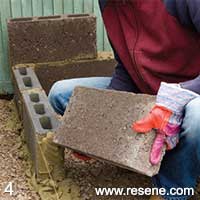
Mix a mortar of five parts builders’ sand to one part cement. It’s easiest to use a cement mixer, especially if you’re building a large bed. Starting with the sprayed straight edges, lay the first course of blocks, placing them on their longest end, on a bed of mortar 5cm deep. Run a length of string between two pegs to help keep the blocks in a straight line. Use a spirit level to check the blocks are level.
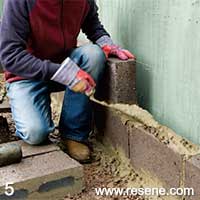 Step five
Lay the second course of concrete blocks on top of the first, using another bed of mortar, this time about 2cm deep. Make sure the two layers form a brickwork pattern, using a hammer and bolster chisel to cut blocks in half for the ends. Check the levels again.
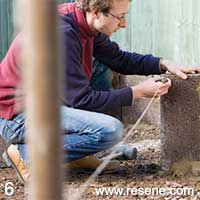 Step six
When it comes to making the curved edges of the bed, lay concrete blocks on their short ends (this is the exact height of the two blocks on top of each other used for the straight edges). This time, use a bed of mortar that is roughly 5cm deep. It’s important to keep checking that the curved line matches up to the mark on the string tied to the pole.
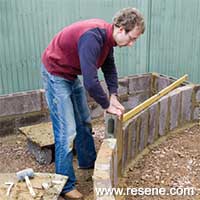 Step seven
Lay the ends of the curved edges first, working in towards the centre. Carefully slot in the last block, cutting it to size if necessary. Make sure all edges of the bed are level on the vertical and horizontal, and tap them straight with a rubber mallet if necessary. Leave the whole thing to go off (set) overnight.
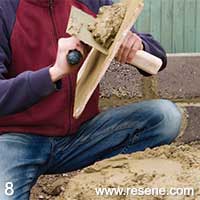 Step eight
Mix a mortar of five parts sand to one of cement, enough to fill the cavities in the blocks. Fill them and hose lightly, ensuring the top of the second course of blocks has an even finish. Allow to go off. Once set, make a plaster (render) mix of three parts sand to one part cement. Add a dash of washing-up liquid as a plasticiser to make the mix smoother and easier to apply. Mix to a creamy consistency.
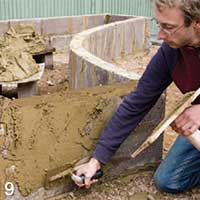 Step nine
Apply the first coat of plaster to the blocks. It should be 5-10mm deep and it doesn’t matter if it’s quite crude. Cover the outside. You’ll only need to plaster halfway down the inside of the bed, as the soil will cover the rest. Once you’ve finished, score large diamond patterns into the surface using the corner of your trowel. This is called a scratch coat. Wait for the scratch coat to go off overnight, then apply a second, smoother coat on top. Don’t worry if the finish is a bit rough.
 Step ten
Before the second coat goes off completely, gently rub it with a piece of foam or sponge. This will smooth out imperfections and give the plaster a consistent finish over the whole surface. Then immediately apply a coat of Resene Limelock and allow to dry. Apply a coat of Mulseal Plus waterproofing membrane to the inside of the bed to prevent water coming through the blocks and affecting the paint.
 Step eleven
If using Resene Lumbersider in a dark, heat-absorbing colour, leave the Limelock a week before painting over. Otherwise leave for a day and paint two to three coats of Resene White (or other pale colour). Resene Limelock’s ability to cure and seal the concrete eliminates the need to leave it to cure for seven days before painting.
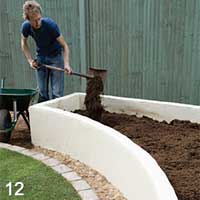 Step twelve
If using Resene Lumbersider in a dark, heat-absorbing colour, leave the Limelock a week before painting over. Otherwise leave for a day and paint two to three coats of Resene White (or other pale colour). Resene Limelock’s ability to cure and seal the concrete eliminates the need to leave it to cure for seven days before painting.
![]() Get inspired ! Subscribe
Get inspired ! Subscribe ![]() Get saving ! Apply for a DIY card
Get saving ! Apply for a DIY card
![]()
Can't find what you're looking for? Ask us!
Company profile | Terms | Privacy policy | Quality and environmental policy | Health and safety policy
Colours shown on this website are a representation only. Please refer to the actual paint or product sample. Resene colour charts, testpots and samples are available for ordering online. See measurements/conversions for more details on how electronic colour values are achieved.
What's new | Specifiers | Painters | DIYers | Artists | Kids | Sitemap | Home | TOP ⇧