DIY project from NZ Gardener magazine
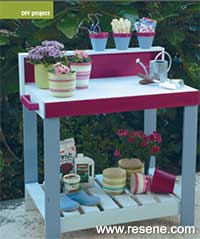
Tidy up your garden shed – build this nifty potting table to store all your potting paraphernalia.
Cleanliness might be next to godliness, but I have to confess to a devil-may-care attitude to my garden shed. It’s always a hellish mess – a jumble of seed packets, old bulbs, boxes of slug bait, assorted gardening gadgets, muddy tools and pots and a big pile of half-used bags of potting mix and mulch. Tidy up your garden shed – build this nifty potting table to store all your potting paraphernalia.
This could explain why, when I need to pot up new plants, I invariably end up doing it in the kitchen sink. (Which is how I learnt the rather costly lesson that waste disposal units are no match for potting mix!)
What I’ve always needed was a purpose-built potting table – and that’s exactly what I’ve now got. This bench can easily be built in an afternoon. We made ours 90cm tall, but you can make the legs longer or shorter to suit your height, so it’s comfortable to work at. Best of all, this potting table is light enough to lug around the garden – I think mine will end up doubling as a barbecue bench (or a wine bar!) in summer. The palette we used: Resene Lip Service, Resene Escapade and Resene Cut Glass.
Learn to make a potting table:
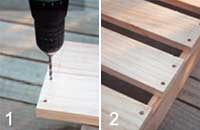
Steps 1 & 2
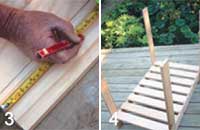
Steps 3 & 4
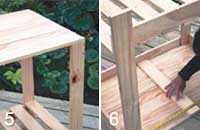
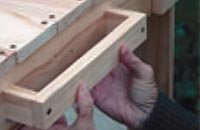
Steps 4 & 5
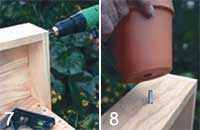
Steps 7 & 8
Step 9
Build the bottom shelf first, using two of the 1m planks and eight of the 60cm planks. Drill two holes at each end of the 60cm planks.
Stand the two 1m planks upright, then space the 60cm planks evenly along them and screw into place. Make sure they're square.
Mark a line 20cm from the bottom of each of the four 90cm leg planks and use these as a guide to screw the lower shelf to the legs.
Stand the potting table upright. To create a frame for the top, screw a 60cm plank (held vertically) across each end.
Make the top by drilling and screwing 7 of the 1m planks into place. Then add another 1m plank to the front (this is the board we painted pink).
Turn the potting table over and mark the centre. Then screw the last 60cm plank to the underside of the table for extra strength.
Build the back shelf by screwing the 32cm planks to each side of the table, then screwing the final three 1m planks to the side pieces.
Drill three holes through the top of the back shelf and thread a bolt through the wood, into the terracotta pot. Secure with a nut and washer.
Finally, add the handles. Our handles are made from 25cm lengths of 4"x1" timber attached to a 4cm x 4cm block at each end.
![]() Get inspired ! Subscribe
Get inspired ! Subscribe ![]() Get saving ! Apply for a DIY card
Get saving ! Apply for a DIY card
![]()
Can't find what you're looking for? Ask us!
Company profile | Terms | Privacy policy | Quality and environmental policy | Health and safety policy
Colours shown on this website are a representation only. Please refer to the actual paint or product sample. Resene colour charts, testpots and samples are available for ordering online. See measurements/conversions for more details on how electronic colour values are achieved.
What's new | Specifiers | Painters | DIYers | Artists | Kids | Sitemap | Home | TOP ⇧