Craft a mailbox with Character. Mailboxes are functional objects but don't have to be drab or unattractive.
Build your own plywood mailbox following our simple guide or just revamp an existing one with these creative suggestions.
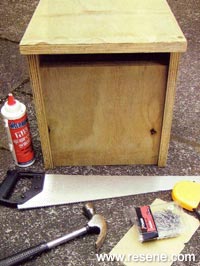
To make the basic mailbox you will need:
Assemble the mailbox in the following order, using 40mm galvanised jolt head nails and exterior PVA glue.
![]()

Over the rainbow
To create this colourful 70s inspired design follow these steps:
Prime the entire basic mailbox with Resene Quick Dry primer
Paint the inside and outside (excluding the front panel) with two coats of Resene Lumbersider tinted to Resene Paua, allowing two hours for each coat to dry.
Using low-tack masking tape for a neat edge, paint seven equal stripes, using two coats of the following testpot colours: Resene Havoc, Resene Broom, Resene Japanese Laurel, Resene Resolution Blue, Resene Bullit and Resene Christalle.
Apply one coat of Resene Clearcoat UVS acrylic UV protective glaze to the outside of the mailbox (this will ensure the colours stay brighter for longer).
Attach a brass number to the centre of the front panel.
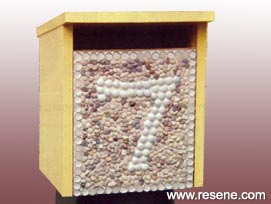
Mosaic masterpiece
Combine small aquarium pebbles with white and clear glass nuggets to create this subtle effect.
Prime-the entire basic mailbox with Resene Quick Dry primer undercoat. Leave to dry for two hours.
Paint the inside and outside (excluding the front panel) with two coats of Resene Lumbersider tinted to Resene Chardonnay. Allow two hours for each coat to dry.
Paint the front panel with two coats of Resene Lumbersider tinted to Resene Alabaster, again allowing two hours for coats to dry.
Lie the mailbox on its back. Glue a row of clear glass nuggets around the edge of the front panel using a generous amount of exterior PVA glue. Use the same technique to glue white glass nuggets to form the central number.
Infill the 'background' using aquarium pebbles, again using a generous amount of exterior PVA glue. Allow to dry thoroughly before standing upright.
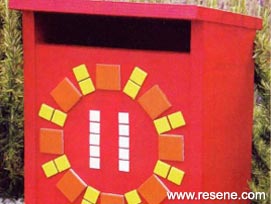
On the tiles
Use coloured ceramic and vitreous glass tiles to create this simple yet effective sun-burst design:
Prime the entire basic mailbox with Resene Quick Dry primer undercoat. Leave two hours to dry.
Paint the inside and outside with two coats of Resene Lumbersider tinted to Resene Monza. Allow two hours for each coat to dry.
Lay the mailbox on its back and place a round plate on the front panel. With exterior PVA glue, fix 45mm x 45mm orange ceramic tiles and 25mm x 25mm yellow ceramic tiles in a circle, using the plate edge as a guide. Ensure tiles are at equal intervals.
Remove the plate. With exterior PVA glue, fix 20mm x 20mm white vitreous glass tiles within the circle to form numbers. Allow glue to dry thoroughly before standing upright.
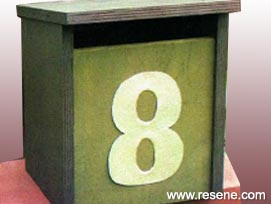
Go with the grain
Coloured wood stain enhances outdoor timber and plywood. For this natural looking version of the basic mailbox:
Punch in nail heads and fill holes with exterior plastic wood filler. Allow to cure.
Lightly sand the wood filler and sand any rough edges.
Following the manufacturer's instructions, stain the inside and outside (excluding the front panel) with two coats of Resene Woodsman waterborne wood stain tinted to Resene Touch Wood.
Stain the front panel with two coats of Resene Woodsman waterborne wood stain tinted to Resene Grey Green.
Use tin snips to cut out a house number from a piece of pressed aluminium and fix this to the front of the mailbox with 20mm zinc plated panel pins.
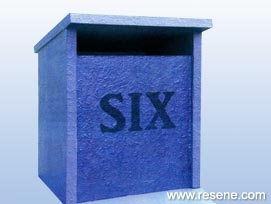
Metal mania
Create this industrial-style version of the basic mailbox with textured and metallic paint.
Prime the entire mailbox with Resene Quick Dry primer undercoat. Leave to dry for two hours.
Paint the outside of the mailbox with one coat of Resene Sandtex Mediterranean effect, dabbing the paint on with an old brush to create a textured effect. Leave to dry for several hours.
Paint the entire mailbox with two coats of Resene Lumbersider tinted to Resene Astronaut, allowing two hours for each coat to dry.

Metal mania continued...
Lay the mailbox on its back. Paint the front panel with one generous coat of Resene Enmacryl Metallic tinted to Resene Time Warp, dabbing the paint on to add to the textured effect. Leave to dry for two hours.
Cut out a photocopied enlargement of a house word/number to make a stencil and use a test pot of Resene Indian Ink to stencil the word/ number on the mailbox. Apply a second coat, if necessary. Allow to dry.
Apply one coat of Resene Concrete Clear to the outside of the mailbox and allow to dry for two hours.
![]() Get inspired ! Subscribe
Get inspired ! Subscribe ![]() Get saving ! Apply for a DIY card
Get saving ! Apply for a DIY card
![]()
Can't find what you're looking for? Ask us!
Company profile | Terms | Privacy policy | Quality and environmental policy | Health and safety policy
Colours shown on this website are a representation only. Please refer to the actual paint or product sample. Resene colour charts, testpots and samples are available for ordering online. See measurements/conversions for more details on how electronic colour values are achieved.
What's new | Specifiers | Painters | DIYers | Artists | Kids | Sitemap | Home | TOP ⇧