An aesthetic and practical nursery can be a gift to a mother as well as the baby. But how much does it cost to create a beautiful bedroom for a baby when you are on a budget? We asked Anya Brighouse to use her creativity for a young couple in a rented home.
Kim Parker loves her family and she loves children. However, over the past two years she has had some major challenges and heartbreaks in both of those areas. Her sister, the mother of two small children, was diagnosed with an aggressive cancer and underwent emergency brain surgery to remove one of the tumours. This event turned Kim's life upside down. She put her life on hold to rally with friends and family to care for the children and help her sister's family through a rough and scary time. After supporting her through months of intensive treatment, Kim experienced the miracle of seeing her sister and best friend recover and regain her health.
Shortly, after, however Kim wanted to start her own family, but because she had acute peritonitis as a teenager, there was a question over whether she and her husband would be able to have children. Doctors had told her that it could be difficult and would probably require some medical intervention.
So it was really special for me, less than a year after that devastating news, to be part of creating a room to welcome baby Chloe Grace. To Kim and Bruce this child feels like the most amazing gift and her arrival is another confirmation that miracles do happen.
Preparing this nursery for Kim and her baby girl was fantastic. It was not only fun, but it was a celebration of a miracle and of answered prayers. Chloe was just eight days old when we did her room.
So here is how we did a special room for this special baby.
The room planned for this nursery was tiny (as babies' rooms often are) with wonderful afternoon sun, so we decided to do the whole room in a soft white. For this we chose Resene Half Villa White. We painted everything – the walls, the floor and the ceilings - in this colour. The idea was to keep it nice and simple. We used Resene Spacecote on the walls which is a scrubbable paint, so when she is older, any marks can be easily removed. We painted the cot in Resene Enamacryl (a water-based enamel that is certified for use with children's furniture). This paint has a long curing time (a week) so we gave ourselves plenty of time after painting before the cot needed to be used for the baby. The cot was painted in Resene Alabaster from the Resene Whites and Neutrals Range.
The curtains are ready-to-hang and come from Ezibuy at $24.95 each.
We made curtains out of blackout fabric to hang behind them. It is a cheap way to keep the light out and the heat in – making the temperature easier to control which is obviously important with a newborn. The house is of the older variety and floor length curtains keep out any drafts from old wooden window frames. And full length curtains have more dramatic impact in this space as well.
The curtain rail is from Spotlight, is extendible and great value at only $19.95.
I am a great believer in being creative with furniture. I don't think we need to buy expensive pieces of furniture which manufacturers tell us we must have for the baby's safety and comfort. A change-table is a perfect example. Our mothers changed us on a bed or the floor - which really just about is the safest place to do it!
So we used an old hall table we found in a junk shop for $50. You can also use a chest of drawers the right height. The rule with small babies is never leave them unattended and I sometimes think that professionally made change tables give us a false sense of security. Don't leave your baby unattended is always the safest rule!
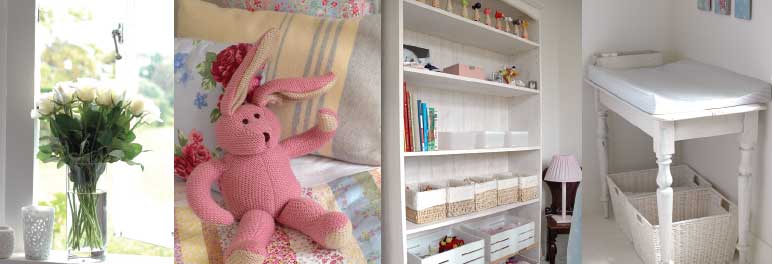
The beautiful changemat on the table is from Treehouse (it's called blue stripe) as is the beautiful pink table lamp with the gathered shade. The lamp is a favourite of mine as it can be used with a small bulb for low light when you are feeding at night while the baby is tiny and as they get older they get to use it themselves. In my house it is a night light with a 40watt bulb for my eight-year-old daughter.
The little box with all the nappy changing 'stuff' was picked up in a junk shop for a few dollars and fits perfectly. We kept all the main items in the room various shades of white and then used fabrics for colour and vibrancy. We mounted three small pictures by the change table so the baby has something to distract her while she is being changed. Some of the fabrics we simply colour-photocopied and put them in the frames that came from the Two Dollar-Shop. The boxes underneath the table are from the Plastic Box and start at around $30.
As space was limited we didn't introduce a chest of drawers but used the bookcase (from Target $200) that was already there. It had been white-washed in milk paint in the colour Oyster. Again we used a range of boxes from the Plastic Box in Newmarket which start at around $12. Using the book case meant that some of the beautiful things she had been given could also be displayed without taking up too much useful space. For simple storage boxes we used old ice-cream containers in white which I covered with photocopies of the fabrics. Cheap and cheerful!
To avoid the room ending up being flat and boring with all that white, I painted a large letter C on the wall. I took the letter off the computer and then at a photocopy place got them to blow it up and put it on to acetate. I borrowed an overhead projector and drew around the image with chalk. Then it was painted with two coats of paint. We used Resene Nemo from the Resene KidzColour range.
The fun part of it all for me, of course, was the fabrics, because this was where all the colour came into play. We used light blue as our base colour tying everything in with the C on the wall.
The little blue fleece blanket is from The Warehouse and cost only $6.46. I was lucky to find the lovely blue and white polka dot cushion at Wallace Cotton for $24. We also got the white cotton quilt ($89) and a teatowel from there which I used as the backing for one of the cushions.
All the bedding from Wallace Cotton comes in a draw-string bag so we used those as laundry/toy storage bags.
The floral striped bedding came from Spotlight with the duvet set starting at $24.
There is still vintage type stuff around if you are willing to hunt, and that vintage effect is still 'a look' (if not overdone) that will last girls from babyhood into their very early teens.
Check out both Ezibuy and Wallace Cotton as both have some lovely quilts and bedding. For variety of texture I used an old blanket for the front of a cushion. Sometimes you can still find them around and cut them into a cot size for a fraction of the price of a new one. Look out on Trade Me as they can go for as little as $8-$10.
The lovely floral rose fabric came from Spotlight at around $6 a metre. To finish the room off I found a mat for the floor on sale at Redcurrent for $39. I think I got the last one. I added a lampshade from Lighting Plus for $24 on sale.
I covered it with the lovely blue paisley fabric. The trick to getting a good finish is to starch the fabric before you roll it on and to use a spray adhesive so you can reposition the fabric if you need too. I just put binding from Spotlight on the inside to cover the fabric neatly.
Another fun idea would have been to put a small chandelier in the room, as there are many small chandeliers available now that are reasonably priced.
It was a wonderful room to do and I am very happy with how it all turned out. It is a room that can easily grow with a little girl. The quilt and cushions will go on to her bed as she grows up, the change table will become her desk. The book case will get used for different things as storage for clothes becomes available under her single bed.
A little bit of thought as you plan a room means it will go a long way with your child.
Download as pdf Return to more projects
![]() Get inspired ! Subscribe
Get inspired ! Subscribe ![]() Get saving ! Apply for a DIY card
Get saving ! Apply for a DIY card
![]()
Can't find what you're looking for? Ask us!
Company profile | Terms | Privacy policy | Quality and environmental policy | Health and safety policy
Colours shown on this website are a representation only. Please refer to the actual paint or product sample. Resene colour charts, testpots and samples are available for ordering online. See measurements/conversions for more details on how electronic colour values are achieved.
What's new | Specifiers | Painters | DIYers | Artists | Kids | Sitemap | Home | TOP ⇧

