Sometimes more than just a paint finish is required!
Paint effects allow you the freedom to capture a mood, create an ambience and transform the mundane into something special. Some techniques also have the extremely practical benefit of disguising less than perfect surfaces. In fact, imperfections in the surface can add to the overall impact of the effect. Paint effects are designed for durability giving you confidence that the look you painstakingly create will continue to look good. Use the Resene FX range and your favourite Resene colours to create an infinite range of effects finishes – concrete, rust, crackle, limewash and more - to turn even the plainest of surfaces into an instant talking point.
Here's some ideas to get you started:
Textured paint effects have never been more popular and are being used to create both interest and an air of authenticity.
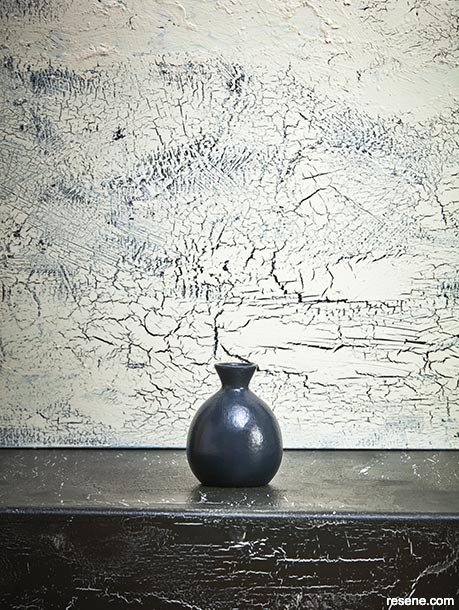
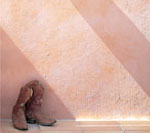
Wall basecoat in Resene Eternity with Resene FX Crackle effect and topcoat in Resene Thorndon Cream, plinth basecoat in Resene Thorndon Cream with Resene FX Crackle effect and topcoat in Resene Eternity and vase in Resene Cinder.
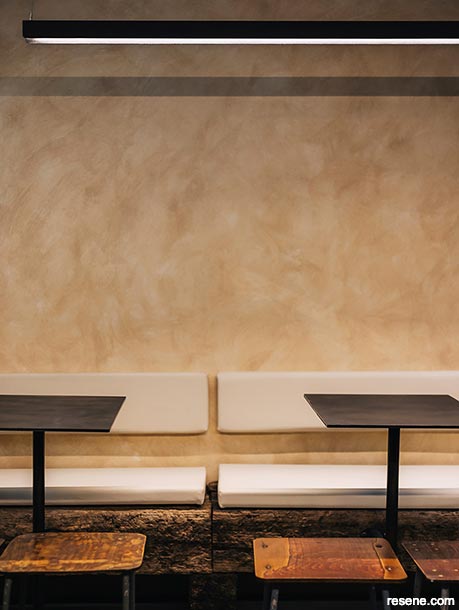
Watda Dumplings on Ponsonby Road is one of the newest additions to Auckland's popular nightlife and shopping strip.
Mark and his team created a unique look for the walls using Resene Sandtex Mediterranean finish in Resene Grain Brown with Resene FX Paint Effects Medium mixed with Resene Quarter Sorrell Brown. Design by Wondergroup. Build and painting by Surface. Image by Logan West.
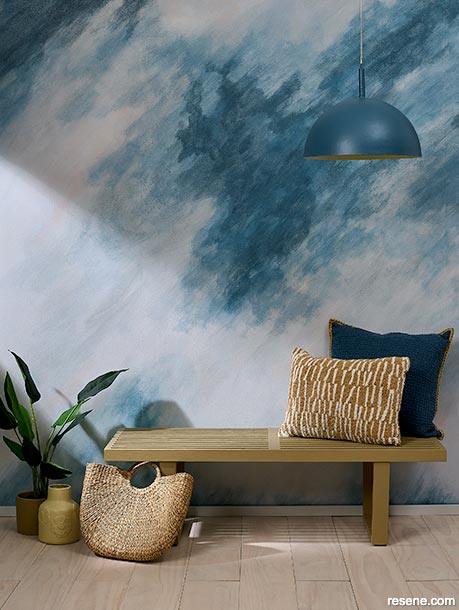
Clever use of a mural wall design can give you the sense of being surrounded by the sea, even when you don't live near the coast.
Mural painted in Resene White Pointer, Resene Half Breathless, Resene Half Dusted Blue, Resene Seachange, Resene San Juan and Resene Soothe, bench seat in Resene Colins Wicket and floorboards finished in Resene Colorwood Breathe Easy.
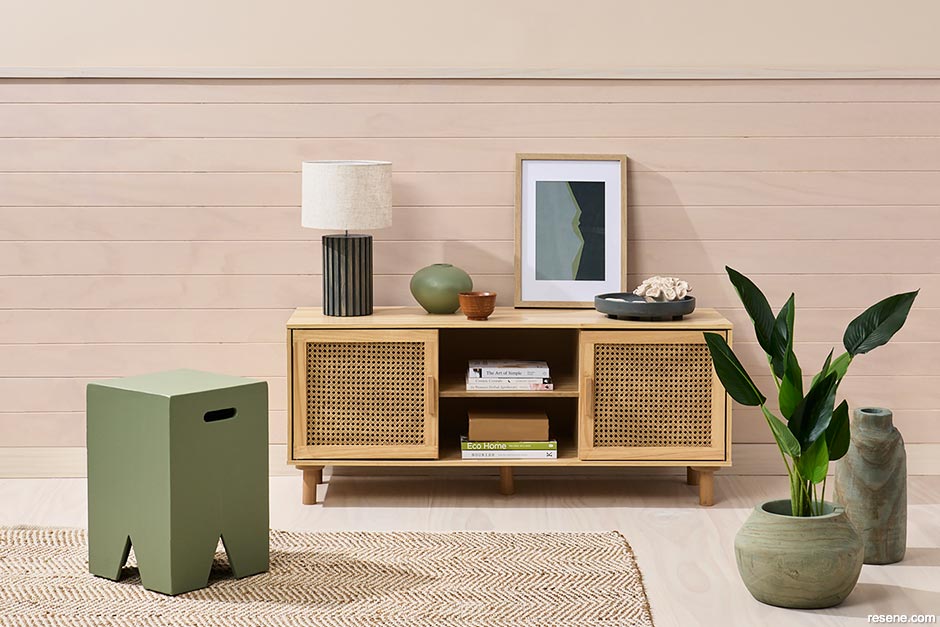
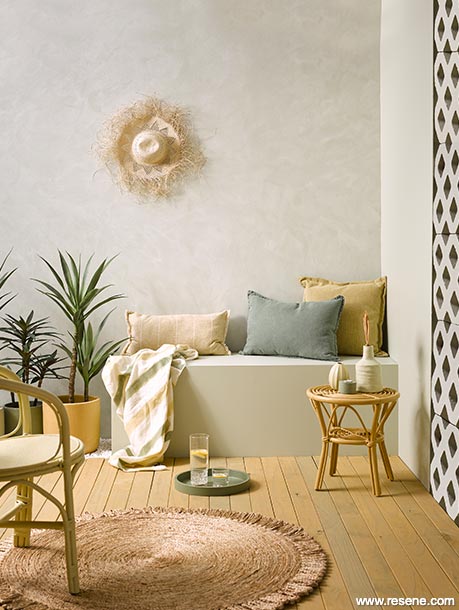
Bring the beach in to enjoy year round with the Resene Colorwood 'We Speak Beach' collection.
Wall in Resene Bone with tongue-and-groove panelling finished in Resene Colorwood Becalm, floor in Resene Colorwood Breathe Easy, sideboard in Resene Colorwood Bask, lamp and low platter in Resene Colorwood Shade, wooden plant pot and vase (on floor) in Resene Colorwood Shore Thing (left) and Resene Rising Tide (right), stool and painted vase (on sideboard) in Resene Paddock, faux coral in Resene Bone, painted book in Resene Brown Sugar and DIY artwork in Resene Rolling Stone, Resene Paddock and Resene Mine Shaft.
Nature and wellness remain key drivers of colour trends during challenging times, but there's a brighter future ahead.
Right wall in Resene Mangrove with Resene FX Paint Effects Medium coloured with Resene Ravine, left wall in Resene Ravine with Resene FX Paint Effects medium coloured with Resene Mangrove, floor in Resene Pumice with FX Paint Effects medium coloured with Resene Ravine, large vase (with toetoe) in Resene Nirvana, plant pot in Resene Miso and small vases in Resene Travertine and Resene Possessed. Bench and cushion from Bauhaus.
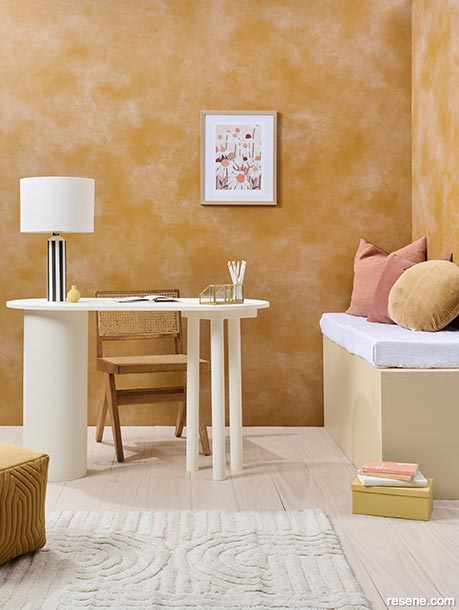
Just as retro interior colours and styles have found their way back into our hearts and our homes, so too are paint effects having a moment.
Wall treatment: Resene Salted Caramel with Resene FX Paint Effects Medium mixed in with Athena, Floor: Resene See the Light, Desk: Resene Meringue, Toy box (reading nook seat): Resene Athena, Plinth: Resene See the Light, Change out vases in: Resene Liquid Gold and Resene Pioneer Red.
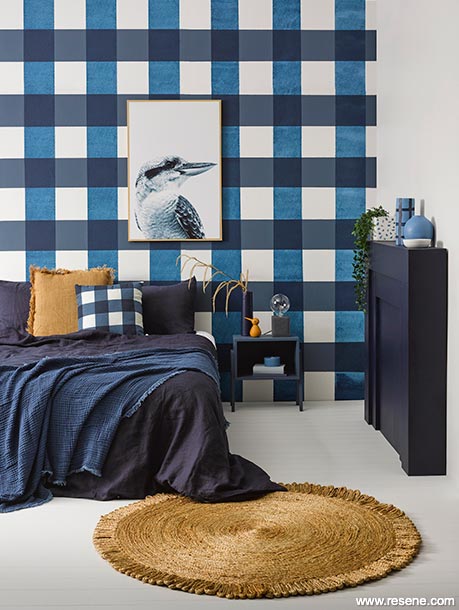
There are plenty of patterns with which you can apply paint to a wall, depending on your taste. When it comes to gingham, there's something undeniably timeless and classic about it. Combined with a fresh, modern hue, you have the perfect partnership.
Back wall in Resene Sea Fog with plaid feature in Resene Indian Ink and Resene Rhino, side wall in Resene Double Sea Fog, fireplace in Resene Indian Ink, bedside tables in Resene Rhino, vases in Resene Indian Ink, Resene Kashmir Blue and Resene Double Sea Fog and planter painted in Resene Double Sea Fog with Resene Kashmir Blue dash paint feature.
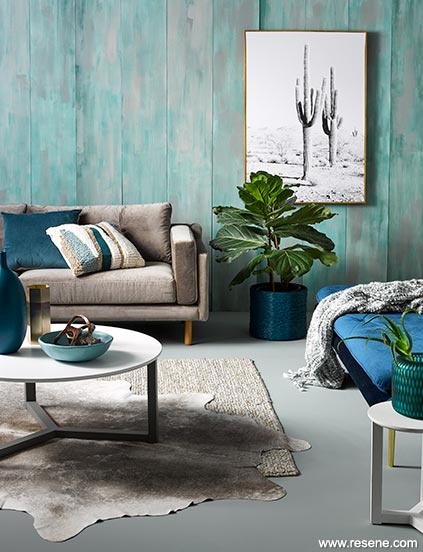
Sea greens and teals are softened with soft greys for a look that suits any season and any style of house.
The plank paint effect is done with a basecoat of Resene Inside Back, roughly over-brushed with Resene Gulf Stream, Resene Stromboli and Resene Half Opal. The floor is painted in Resene Inside Back, the coffee table legs are in Resene Half Gravel and the top is in Resene Alabaster. The side table is painted in Resene Bianca, the planter basket in Resene Billabong, the tall vase is in Resene St Kilda and the bowl is in Resene Wishlist.
While the palette and textures in this space may have a strong nod to nostalgia, they've been spun in a way that feels much more contemporary than retro.
Pale pinks and blues featured heavily in the dining rooms of the 80s and were often combined together in a single scheme. These popular pastels of yesteryear have now been updated with muddier tones. The wall in Resene Duck Egg Blue has also been given a soft 80s-esque texture using Resene FX Paint Effects Medium with Resene Rolling Stone while the sideboard in Resene Inside Back both coordinates and contrasts.
When the sun is shining and the air is warm, a place to relax outside, read a book and enjoy a tipple should be on everyone's to-do list.
Back wall in Resene Aspiring with paint effect in Resene FX Paint Effects Medium coloured with Resene Moon Mist, right wall, breeze blocks and vase in Resene Moon Mist, bench seat in Resene Aspiring, deck in Resene Woodsman Uluru, table and large plant pot in Resene Teak, tray in Resene Flax, small plant pot in Resene Siam and chair in Resene Yuma.
Background in Resene Foundation with Resene FX Paint Effects Medium mixed with Resene Courtyard applied on top.
A4 drawdown paint swatches in (from top left to bottom right) Resene Boris, Resene Kia Kaha, Resene Courtyard, Resene Foundation, Resene Stepping Stone and Resene Kinship, square pot in Resene Courtyard, curved vase in Resene Kia Kaha and bud vases in Resene Sea Fog (top) and Resene Boris (bottom). Projects by Amber Armitage, mood boards by Melle van Sambeek, images by Bryce Carleton and Wendy Fenwick.

With more reasons to stay at home than ever before, there's a big draw in turning your home into the kind of place where you can both relax and socialise.
Back wall painted in Resene Triple White Pointer. Side wall in Resene Half Resene Friar Greystone with Resene FX Paint Effects Medium tinted with Resene Quarter Friar Greystone applied to the wall using a large brush in a swirly motion then wiped off with a clean, dry rag to create a marbled effect. Tongue-and-groove flooring in Resene Triple White Pointer. Trellis panels painted in Resene Woodsman Exterior Whitewash. Patio bar pallets in Resene Ironsand and wood top in Resene Friar Greystone.
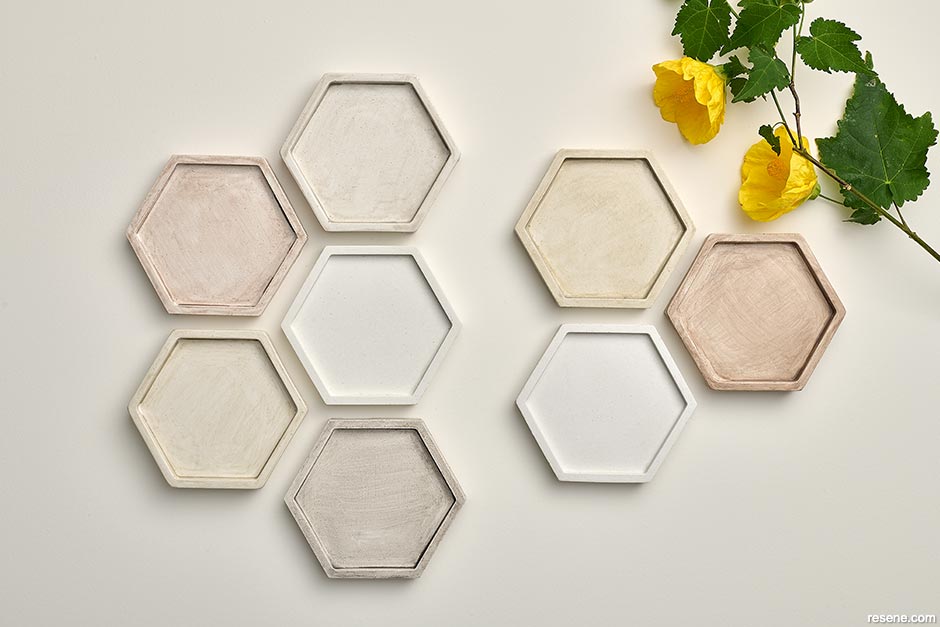
Achieve semi-transparent colour changes on a wide range of concrete surfaces both indoors and out with the Resene 'In The Wash' collection of concretewash colours. This new range can be used to bring subtle, buildable sheer colour to concrete walls (interior and exterior), interior floors, exterior walkways and decorative elements like concrete planters and furniture.
Background painted in Resene Rice Cake with concrete hexagon plates in (clockwise from top left) Resene Concrete Clear satin tinted to Resene Greigewash, Resene Whitewash, Resene Stonewash, Resene Blondewash and Resene Claywash. White concrete plates from Blow My Wick.
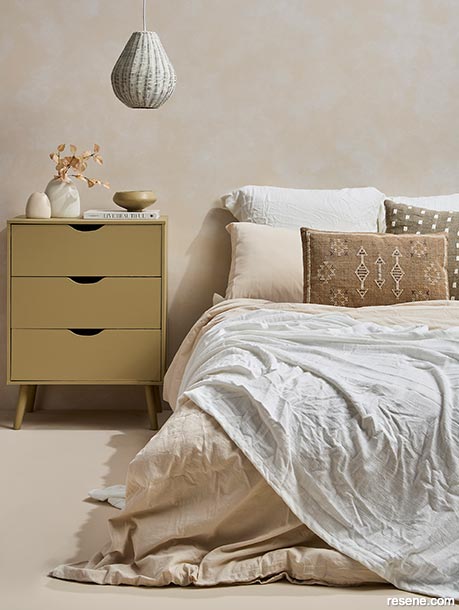
When many people think of luxury, they associate it with needing to spend big money on fancy status symbols. The thing about luxury, though, is that it only needs to 'look' expensive; it doesn't actually have to come at a high cost.
Wall in Resene Bleach White with brushstroke texture in Resene FX Paint Effects Medium mixed with Resene Cashmere, Floor in Resene Dover White, Skirting board in Resene Bleach White, Headboard in Resene Caffeine (Resene Enamacryl gloss), DIY stacked box table in Resene Tom Tom, Large vase with handles in Resene Karry, Seashell vase in Resene Cashmere, Pendant lamp in Resene Dover White, Skinny fluted vase in Resene Dover White.
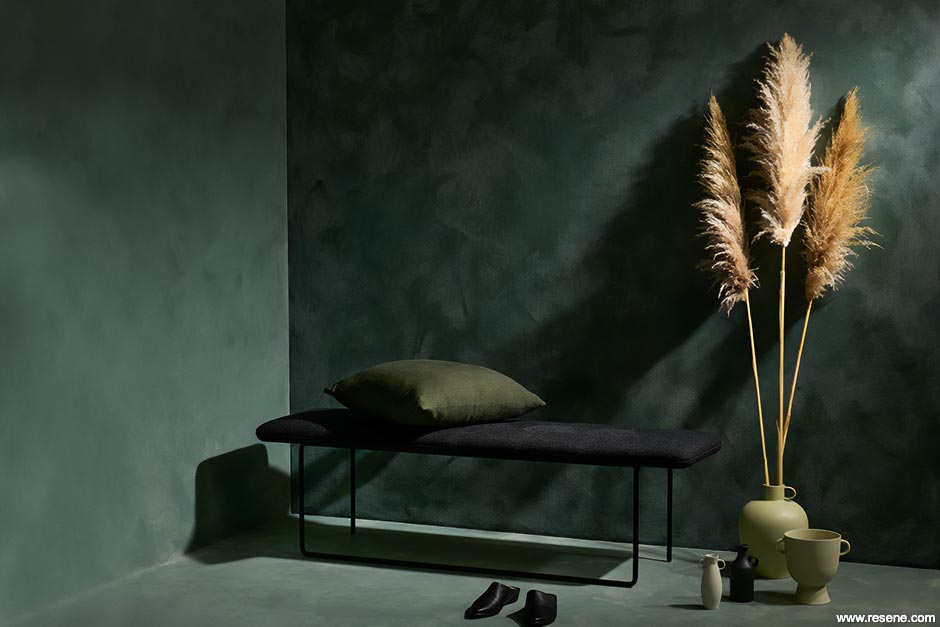
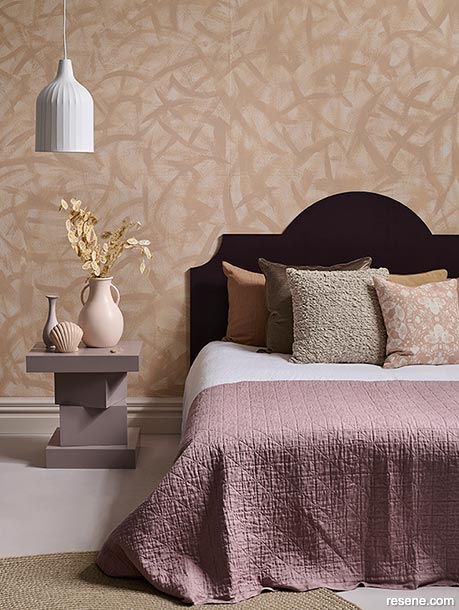
Spaces that support notions of self-care and provide solace from the busyness and complexities of everyday life – especially those that bring a human touch and embrace imperfection – are appealing for those looking for room to recover during overwhelming times.
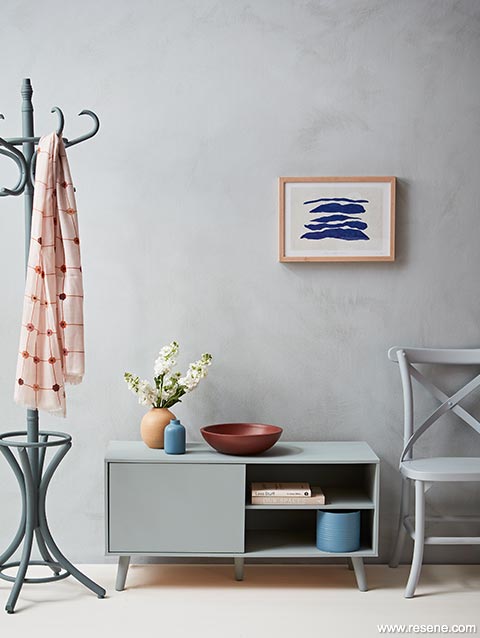
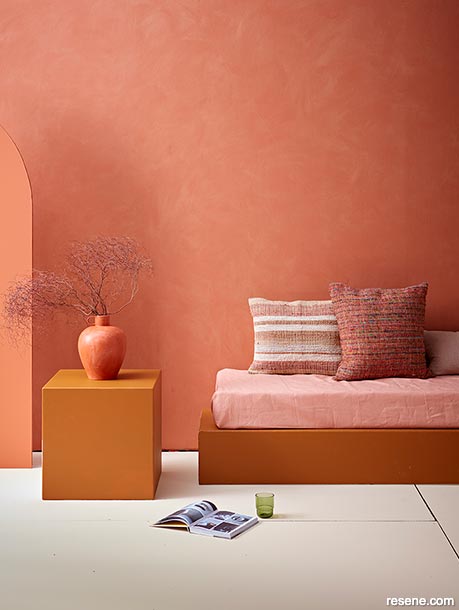
Wall in Resene Thorndon Cream with paint effect in Resene FX Paint Effects Medium mixed with Resene Half Nomad, floor and vase in Resene Cinder, painting in Resene Eternity with Resene FX Crackle effect and topcoat in Resene Thorndon Cream and chair in Resene Scrub. Duvet, pillowcases, velvet cushion and quilt from Città, patterned cushion from Penney + Bennett, scarf and striped linen sheets from Father Rabbit.
How about bringing the beach to you – break out the Resene paints and stains, and create a magical wall that's a cross between a mural and a paint effect.
Wall – in Resene stains Resene Colorwood Riverstone, Resene Colorwood Silvered Grey, Resene Colorwwod Skywater and Resene Colorwood Whitewash, Floor – Resene Eighth Stonehenge, Wicker cabinet – Resene New Denim Blue, Pendant – Resene Half Stonehenge, Vase – Resene Neutral Bay, Ball tealight holder – Resene New Denim Blue, DIY Tall rattan vase – Resene Quarter Neutral Bay, DIY Bottle rattan vase – Resene Rhino, DIY Small rattan tealight holder –Resene Eighth Stonehenge.
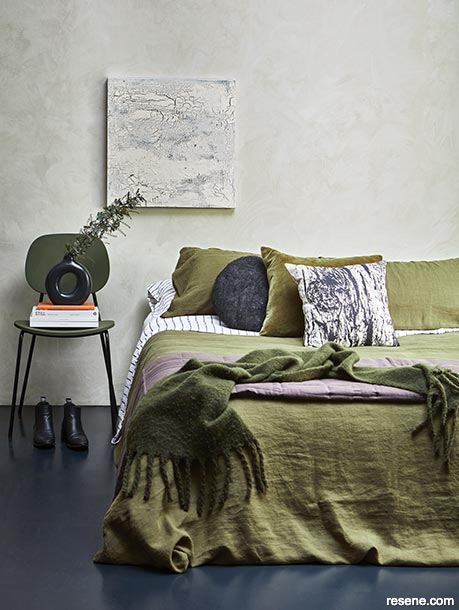
Imperfection may seem to be a peculiar thing to try to achieve but in a world where many aspects of our lives are controlled and scheduled, a little bit of wonkiness is a good thing. We're craving organic looks and walls that look as if they have a weathered patina or texture.
Base wall colour – Resene Biscotti with Resene FX Paint Effects Medium mixed with Resene Quarter Thorndon Cream, Floor – Resene Biscotti, Bedside table – Resene Colins Wicket, Pendant – Resene Thorndon Cream, Vase with flowers – Resene Thorndon Cream, Bowl – Resene Colins Wicket, Chest of drawers – Resene Colins Wicket, Small vase – Resene Quarter Doeskin.
While it's often popular for the peaceful, countryside feeling it imparts to a space, Tuscan-style decorating's greatest appeal is its simplicity. And because Tuscan-inspired rooms often combine comfortable, worn and well-loved pieces, these spaces become effortlessly warm and inviting.
Walls in Resene Wild West with ragged effect in Resene FX Paint Effects medium mixed with Resene Sante Fe, Floor in Resene Bianca, Bench base in Resene Korma, Plinth in Resene Korma, Artwork in Resene Nero (faces) and Resene Waiouru (tiny circle), Props in Resene Sand, Resene Cashmere, Resene Blank Canvas, Resene Bianca, Resene Alabaster, and Resene Brown Bramble.

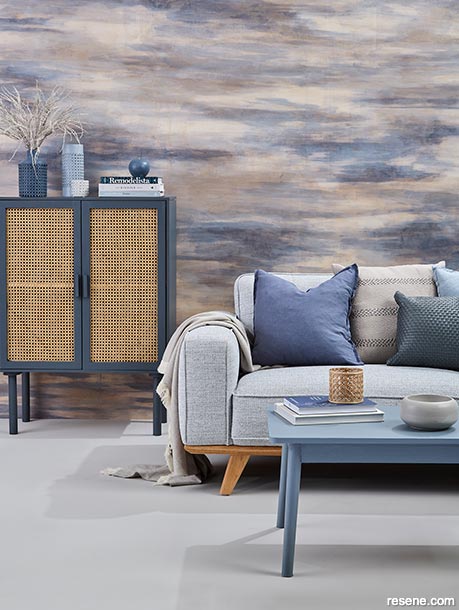
The juxtaposition between old and new or natural and manmade allows us to combine multiple relevant trends in a way that's fresh and interesting.
Back wall in Resene Half Splash, left wall in Resene FX Faux Rust Effect, tabletop and 'sun' in Resene Sunshade, plinths in Resene Karry (tops) and Resene Volcano (sides), balls and leaning rectangle in Resene Wild Thing and leaf in Resene Volcano.
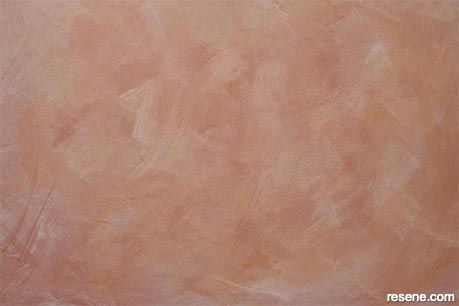
When specifying a limewashed, rag-rolled or similar paint effect, keep in mind that there are a number of choices you'll need to make. Firstly, Resene FX Paint Effects Medium itself is translucent and unpigmented, so you'll need to select a base colour and one or more accent colours that will be mixed into it. While it isn't strictly necessary to choose more than one accent colour, you can achieve a finished look that has more depth to it by specifying multiple hues.
Secondly, you'll need to decide whether you want lighter colours applied over a darker basecoat or darker colours over a lighter basecoat. The difference is less subtle than you might imagine and depends a lot on a third consideration, which is the level of contrast between the colours you choose.
If your paint effect will primarily be viewed in direct, bright sunlight or in a low-light setting, such as a bar or restaurant, you may wish to increase the level of contrast to make your visual texture more apparent so that it doesn't get washed out or fade into the background.
Resene Alpaca applied over darker Resene Sante Fe
Resene Sante Fe applied over lighter Resene Alpaca
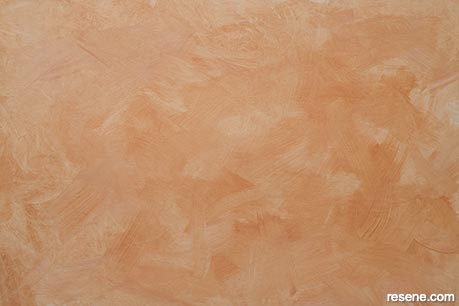
As these two examples demonstrate, Resene FX Paint Effects Medium looks different depending on whether you choose to go light over dark or dark over light. The image on the left shows Resene FX Paint Effects Medium coloured with lighter Resene Alpaca applied over darker Resene Sante Fe while the right shows Resene FX Paint Effects Medium coloured with Resene Sante Fe over Resene Alpaca.
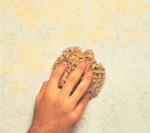
Sponging
Sponging creates a gently mottled or cloud-like effect with harmonising colours...
Colourwashing
A two step process where a basecoat colour is washed over with a stronger colour...
Ragrolling
Ragrolling adds subtle or bold textured effects reminiscent of marble and crushed velvet...

Dragging
Dragging creates a finely striped effect often associated with antiques...
Limewashing
The washed out fresco and soft painted look reminiscent of Mediterranean architecture...

Two colour and two-style effects
Mix and match colours and paint effects for a unique look...
Touches of gold
Resene Gold Effects can be applied over a paint effects finish to add an air of drama...
Daring to be different
Also try: stipple, sparkle, shimmer, texture or crackle finishes...
 When using Paint Effects for your project,
the key thing to remember is that there are no hard and fast rules about
what you should do. Spend time getting the effect right by trialing
different colours and application techniques until you are happy with
the finished look. Then use your trial area as a reference board for
the whole project. Wall sockets, skirting boards and door frames should be masked off so that the effect may be continued right to the edge.
When using Paint Effects for your project,
the key thing to remember is that there are no hard and fast rules about
what you should do. Spend time getting the effect right by trialing
different colours and application techniques until you are happy with
the finished look. Then use your trial area as a reference board for
the whole project. Wall sockets, skirting boards and door frames should be masked off so that the effect may be continued right to the edge.
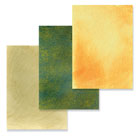
All Paint Effects Medium colours shown have been created by adding one Resene 60ml testpot to one litre of Resene Paint Effects Medium. You can create your own personalised Paint Effects Medium colours simply by experimenting with testpots of your choice. It is often surprising the colour that results when a testpot is added to Resene Paint Effects Medium, so always make sure you test your colour before starting the project. By subtly adjusting either the basecoat or your chosen Resene Paint Effects Medium topcoat you can create a whole new effect. The key to paint effects is to develop your own colour combinations and application technique to add your distinctive mark to the completed job.
A range of paint effects colour combinations are available online to help you decide the effect that suits you. If you are hiring someone to create the painted effect for you, ask them to prepare a sample panel and agree on that as your standard before the job starts. This way, all parties will know what the finish will look like. If worse comes to worse and the final finish is not what you had in mind, you can always create a new paint effect by reapplying the basecoats and paint effects medium topcoat/s.
Resene Paint Effects Medium is a tintable acrylic medium that allows you to easily create unique paint effects, while still enjoying the benefits of lower odour and easy clean up in water.
Resene Resitex or Resene Sandtex are good basecoats for paint effects as the texture adds an extra dimension to the effect.
A coat of Resene Concrete Clear may be applied to the finished paint effect to alter the gloss level and/or add durability to the finish. Over stains and on timber, use Resene Aquaclear. For floors use Resene Concrete Wax.
You can also use many other Resene products to make paint effects – from Resene Blackboard Paint to Resene Metallics, or even just your favourite testpot colours, a stencil, or low tack masking tape. All you need is a little imagination.
The Resene website features a range of paint effects projects, from cracking to sponging to ragging, you can try out for yourself. View the paint effects project gallery. Plus get more inspiration with the habitat plus – paint effects book – view it online.
![]()
Colourwashing
View this colourwashed wall project...
![]()
Wood effect
View this table top project using graining...
![]()
Brushed metallic
View this metallic effect wall project...
![]()
Stencil stippling
View this waste paper basket project...
Work on a sample area first. This is especially important when ragging or sponging as the end result is dependent not only on the colour chosen, but the mix ratio and the style of technique. Remember that first efforts can be hidden by repainting with the basecoat and then restarting the effect as your paint effects expertise develops.
Keep notes of your recipes when creating intermixes or dilutions, as reproducing an exact colour match at a later date may be difficult.
Mask off wall sockets, skirting boards and doors to allow the effect to be carried right to the edge.
When mixing your paint effects medium, add the colour in small increments until you are satisfied with your sample. This will allow you to control the colour you create. If it is too subtle you can increase the amount of colour accordingly.
Allow dry time between coats of Resene Paint Effects Medium.
The addition of up to 10% Resene Hot Weather Additive will slow the drying of Resene Paint Effects Medium. This is particularly useful when ragrolling or colourwashing a large area.
Add up to 5% clean water to thin and improve the flow of the paint effects medium.
Clean up equipment in water.
Coverage varies greatly and is dependent upon the technique used and the substrate. On smooth surfaces, one litre of Paint Effects Medium will cover between 30 – 40 square metres per coat.
Always work from one edge of the surface to the other. Make large areas more manageable by breaking them into smaller strips. Keep a wet edge as you work across the wall.
If you need to take a break, stop at a natural break in the area you are working on, such as in a corner.
Wear protective gloves if ragrolling or sponging.
In all cases, read the appropriate can labels and data sheets before you start.
And most importantly, be patient! There is a paint effect finish to suit all tastes so take your time experimenting with different options. Creating paint effects can be tiring, so be realistic when starting your project. It may be better to start off with one small feature area first rather than tackling an entire room.
How to achieve different types of paint effects
Sponging creates a gently mottled or cloud-like effect with harmonising colours. Sponging is probably the easiest technique to master with an infinite variety of effects possible, according to the type of sponge, the way you wield it and your choice of colours. Furnishings and fabrics are easily coordinated by harmonising their hues, layer upon layer into the final sponged effect. In this way the neutral tonings of a carpet may be coordinated with the rich colouring of curtains and fabrics. Alternatively strikingly original combinations of colour and texture may be obtained with experimentation and imagination. For example, a darker colour sponged onto a lighter background will bring the walls in, while a combination of pale colours used over a darker background will give a cloudy or shadowed look.

Apply two coats of Resene Lumbersider, Resene Zylone Sheen or Resene SpaceCote Low Sheen in your chosen basecoat colour and allow to dry normally.
Mix Resene Paint Effects Medium with one testpot of Resene Lumbersider in your selected colour to produce a ‘sponging medium ’. The mix ratio should be between 60% Resene Paint Effects Medium to 40% your selected colour up to 95% Resene Paint Effects Medium to 5% your selected colour. The greater the proportion of Resene Paint Effects Medium the less opaque the finish will appear. For a subtle change add more Resene Paint Effects Medium. For a more striking effect, add less Resene Paint Effects Medium. Remember the final result depends on combining layers of colour and sponged effects.
Brush the sponging medium onto a piece of stiff card or an artist ’s palette. This is used to charge your sponge with the medium. Avoid using saucers and roller trays, as these tend to clog the sponge.
Dab the sponging medium onto the wall area using a light pecking motion, taking care to avoid a regular pattern. Changing the angle and pressure at which the sponge is impressed will help maintain the randomness of the finish.
Allow the first sponged colour to dry, then repeat the sponging process with your second colour paying attention to spaces in your first pattern. If desired, a third colour can be used sparingly to complement the first two sponged colours.
Use a natural marine sponge dampened in freshwater. Clean the sponge regularly with freshwater during use and between coats to prevent paint clogging the sponge
Replenish the ‘charger’ frequently. If the sponge appears to have soaked up too much of the sponging medium, dab it onto a piece of spare card before applying to the area you are working on
Be careful not to get too enthusiastic with the sponge otherwise you may completely obliterate the basecoat colour
Soft delicate colours through to strikingly rich colourways are easily obtained by using the colourwash technique. Colourwashing is a two step process where a basecoat colour is washed over with a stronger colour reduced with Resene Paint Effects Medium to produce an effect made up of different tones and textures. Traditionally, a white or off-white colour, such as Resene Pearl Lusta, was used as a basecoat; however, interesting effects may be obtained by using lighter shades of the colourwash colour, such as Resene Egg Sour colourwashed with Resene Corvette. More striking effects may be obtained by using contrasting shades, such as Resene Patina colourwashed with Resene Astral.
Apply two coats of Resene Lumbersider, Resene Zylone Sheen or Resene SpaceCote Low Sheen in your chosen basecoat colour and allow to dry normally.
Mix Resene Paint Effects Medium with one testpot of Resene Lumbersider in your selected colour to produce a ‘colourwashing medium ’. Bold effects can be achieved by selecting a testpot colour very different to the basecoat colour, while subtler effects can be achieved by selecting a testpot more similar in colour to the basecoat. The finished mix ratio should be between 70% Resene Paint Effects Medium to 30% your selected colour up to 95% Resene Paint Effects Medium to 5% your selected colour. The greater the proportion of Resene Paint Effects Medium the less opaque the finish will appear. For a subtle change add more Resene Paint Effects Medium. For a more striking effect, add less Resene Paint Effects Medium.
Pour a small amount of the colourwash topcoat into a flat dish or roller tray.
Dip a 125mm Resene Colourwash brush (or similar soft bristled brush) approximately 5mm into the medium and dab onto the wall 2 –3 times. Use the flat edge of the brush to spread the colourwash in a random manner.
For a more intense and uniform effect a second colourwash colour can be applied. Simply mix the second paint colour with the Resene Paint Effects Medium and follow steps 3–4 above.
Colourwash effects can be softened using a dry brush or sponge to blend any obvious brushstrokes or heavy colour as the colourwash topcoat dries
Soften the bristles of the colourwash brush by soaking in water for 10 minutes to make application easier
Avoid obvious lapmarks by working along an ‘S ’ shaped wet edge. Finish brushstrokes to the edge of each drop working back on the succeeding drop
For a subtle finish, use a colourwash medium similar to the original basecoat
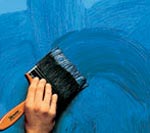
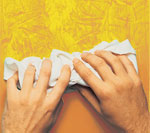
Ragrolling adds subtle or bold textured effects reminiscent of marble and crushed velvet.
While ragrolling (also known as ragging) is one of the most difficult and time consuming paint effects, it can replicate the appearance of marble and crushed velvet, creating the subtle or rich finishes normally associated with the most expensive wallcoverings. The effect is achieved by using a bunched rag or cloth that is rolled or dabbed over the still wet medium, leaving random patterns as it distempers the surface.
Distinctive effects can be obtained by ragging with successive colours. An almost limitless choice of colours for both the base colour and the ragging medium allows you to easily select an effects scheme that will coordinate with the rest of the room.
Apply two coats of Resene Lumbersider, Resene Zylone Sheen or Resene SpaceCote Low Sheen in your chosen basecoat colour and allow to dry normally.
Mix Resene Paint Effects Medium with one testpot of Resene Lumbersider in your selected colour to produce a ‘ragrolling medium ’. The mix ratio should be between 70% Resene Paint Effects Medium to 30% your selected colour up to 95% Resene Paint Effects Medium to 5% your selected colour. The greater the proportion of Resene Paint Effects Medium the less opaque the finish will appear. For a subtle change add more Resene Paint Effects Medium. For a more striking effect, add less Resene Paint Effects Medium.
To ragroll off, apply the ragging medium using a large soft brush to a section of the wall approximately one metre wide. The ragging medium must be applied relatively quickly. “Work” the medium using criss-cross brushstrokes, finally laying off the area in a vertical direction.
Wrap your rag in a loose but compact bundle and roll it using
light downwards pressure in random directions over the wet medium.
Corners and misses can be touched up by using a light dabbing
motion. The aim is to make an irregular pattern that also renders
a uniform finish on the wall.
Alternatively, ragroll on the Resene Paint Effects Medium by dabbing
the rolled rag into the medium and applying it to the surface
in a random manner.
Where possible work in a team of two. Ragrolling is less demanding, particularly on large areas, when two people work in tandem with the first person applying the ragging medium by brush and the second ragging off with the bundled rag
Ensure you have ample supplies of the ‘same’ rag or cloth, preferably from a common source, as the rags will require frequent changing during the ragging process. Rags from a single bedsheet will normally be sufficient to complete an average living room. Linen, baby nappies and even chamois leather make ideal tools for ragging. Ensure the rags are well washed and lint free.
Dragging creates a finely striped effect often associated with antiques.
Dragging (often referred to as strie) is a finely striped paint effect created by dragging a dry brush or comb through the wet paint. Where the brush makes contact with the surface, the dragging medium is removed to reveal the basecoat. Dragging is an easy and popular method of redecorating furniture to achieve an aged finish and is the ideal way to rejuvenate secondhand furniture.
Apply two coats of Resene Lumbersider, Resene Zylone Sheen or Resene SpaceCote Low Sheen in your chosen basecoat colour and allow to dry normally.
Mix Resene Paint Effects Medium with one testpot of Resene Lumbersider in your selected colour to produce a ‘dragging medium’.
Apply the dragging medium by brush or roller, then drag a dry brush or comb through the wet paint in the direction you wish the stripes to run (usually top to bottom). If working alone, apply the dragging medium in a strip one metre wide and create the dragging effect working up to 200mm from the edge of the painted strip. Then apply another strip of dragging medium and continue the dragging effect. If working with a partner, one can apply the dragging medium while the second person can follow creating the dragging effect.
Dragging works and looks best on small areas such as trim and joinery, furniture and small features like curtain rails. It can be difficult to maintain a consistent finish on a larger area.
Wipe the brush or comb with a cloth after each dragging movement to prevent clogging and an undefined finish.
Different dragging effects can be created by changing the brush being used and varying the pressure on the brush when it is being dragged.
If you make a mistake, re-roll the surface and start dragging afresh.
Creating dragging effects on large wall areas is best done by two people working in tandem. One person can apply the medium while the other follows creating the dragging effect.
Always drag along the grain when working on a wooden substrate.
The washed out fresco and the soft painted look reminiscent of Mediterranean and Adobe architecture may be accurately reproduced by using the limewash effect, a two step process not dissimilar to colourwashing. The mood and effect created by limewashing lends itself equally well to both interior and exterior situations, particularly where a traditional or aged finish is desired. The obvious benefit is that a wide range of both unique and traditional colours ranging from oxides through to rich terracottas may be obtained with the resultant finish being both extremely durable and hardwearing. The limewash effect is ideal for any cementitious surface or as an effect to enhance a specialist finish, such as Resene Resitex or Resene X-200.
Apply two coats of Resene Lumbersider, Resene Zylone Sheen or Resene SpaceCote Low Sheen in the appropriate basecoat colour.
Apply Resene Paint Effects Medium mixed in the appropriate topcoat colour as per the colourwashing process.
The key difference between Colourwashing and Limewashing is the colour selection. Limewashing generally uses a lighter basecoat and a darker wash colour of a related colour (e.g.light blue and purple), while colourwashing effects are usually created using a darker basecoat with lighter washes.
Apply the Limewash Effect over a Resene textured finish to add a tactile textured dimension to the finish. For a lightly textured finish use Resene Sandtex applied by brush,roller or spray. For a coarser texture try out one of the Resene Resitex range of products.
To add another colour to your paint effects finish, mix the desired new colour with the paint effects medium and apply. Multiple colours are more successful when sponging or ragrolling. To create a more varied finish, use more than one paint effects technique – for example, colourwash on the first tinted paint effects medium and apply the second tinted paint effects medium using the sponging technique.
![]()
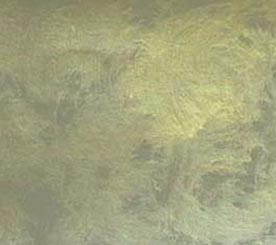
Resene Gold Effects can be applied using any paint effects technique or over an existing paint effects finish to add an air of rich drama to the finish. Used sparingly, Resene Gold Effects can bring a dull paint effects finish to life. Gold effects can be created by mixing Resene Gold metallic with Resene Paint Effects Medium, to create a gold paint effect. Experiment with the ratio of gold paint to paint effects medium depending on the intensity of the effect desired.
![]()
Stippling is another popular paint effect resulting in a suede-like finish. A different colour topcoat is applied over a basecoat in 300mm wide strips. The wet paint is stabbed with a large, soft bristled brush to remove dots of paint. The effect of this technique is to break up the wall colour into a mass of very small dots, which lends a richness to the finish. Stipple effects usually involve two topcoat colours, but additional colours can be incorporated by stippling on, rather than stippling off.
Explore a range of sparkling colours with Resene Metallic Effects. Like a chameleon that changes colour according to its surroundings, light striking a surface coated with Resene Metallics creates the unexpected illusion of colour movement. Resene Metallics can also be used as a paint effects medium when brushed. Choose from a selection of metallic effects from the Resene Metallics and Special Effects Chart.
Shimmering wall finishes are just a glaze coat away with Resene Pearl Shimmer acrylic pearlescent glaze. Ideal for creating softly sparkling illusions, Resene Pearl Shimmer is the perfect way to add visual interest and diversity to any colour scheme. Simply apply over existing paint systems or you can start from scratch applying two coats of a basecoat colour of your choice then finishing it with a single coat of pearlescent. Although spray application is the preferred application method to achieve an even finish, a shimmering paint effects finish can be achieved with brush application. See the Resene Metallics and Special Effects Chart for sample swatches.
![]() All Paint Effects, including the special metallic and pearlescent
effects, can be used over textured basecoats to give an added
dimension to the finish. Textured basecoats will also help to
hide surface imperfections and may even hide application imperfections.
The most commonly used textured basecoat is Resene Sandtex – a
lightly textured product that can be easily applied by brush,
roller or spray. For a heavier textured effect, you can also select
from the complete range of Resene Specialist Coatings. Ask at
your local Resene ColorShop or Reseller to view the Resene Architectural Samples Box for a
full range of textured samples.
All Paint Effects, including the special metallic and pearlescent
effects, can be used over textured basecoats to give an added
dimension to the finish. Textured basecoats will also help to
hide surface imperfections and may even hide application imperfections.
The most commonly used textured basecoat is Resene Sandtex – a
lightly textured product that can be easily applied by brush,
roller or spray. For a heavier textured effect, you can also select
from the complete range of Resene Specialist Coatings. Ask at
your local Resene ColorShop or Reseller to view the Resene Architectural Samples Box for a
full range of textured samples.
![]() Broken, antique-looking finishes can be achieved using Resene FX Crackle.
Crackled finishes are quick and easy to achieve - simply brush
apply one coat of your chosen basecoat colour and allow to dry.
Then apply Resene FX Crackle followed by an acrylic topcoat tinted
to a contrasting colour. Resene FX Crackle will shrink causing the
acrylic topcoat to crack revealing the contrasting basecoat colour.
Crackle effect finishes are best used on uneven or rough walls,
furniture, picture frames, woodwork and small feature areas. Contact
your Resene representative, ColorShop or Reseller for further information.
Broken, antique-looking finishes can be achieved using Resene FX Crackle.
Crackled finishes are quick and easy to achieve - simply brush
apply one coat of your chosen basecoat colour and allow to dry.
Then apply Resene FX Crackle followed by an acrylic topcoat tinted
to a contrasting colour. Resene FX Crackle will shrink causing the
acrylic topcoat to crack revealing the contrasting basecoat colour.
Crackle effect finishes are best used on uneven or rough walls,
furniture, picture frames, woodwork and small feature areas. Contact
your Resene representative, ColorShop or Reseller for further information.
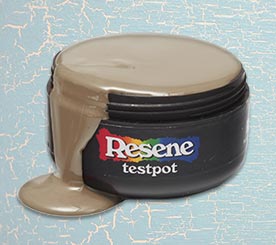
![]() No matter how you select your colours or effect, always use testpots
to confirm your choices in the area you plan to paint. Resene
testpots are available from your local Resene
ColorShop or Reseller or you can order online from the Resene
website. Resene testpots will not only simplify colour co-ordination
but give you an opportunity to experiment with your effect.
No matter how you select your colours or effect, always use testpots
to confirm your choices in the area you plan to paint. Resene
testpots are available from your local Resene
ColorShop or Reseller or you can order online from the Resene
website. Resene testpots will not only simplify colour co-ordination
but give you an opportunity to experiment with your effect.
Order Testpots Paint Effects chart Paint Effects gallery
View habitat plus – paint effects for more ideas
![]() Get inspired ! Subscribe
Get inspired ! Subscribe ![]() Get saving ! Apply for a DIY card
Get saving ! Apply for a DIY card
![]()
Can't find what you're looking for? Ask us!
Company profile | Terms | Privacy policy | Quality and environmental policy | Health and safety policy
Colours shown on this website are a representation only. Please refer to the actual paint or product sample. Resene colour charts, testpots and samples are available for ordering online. See measurements/conversions for more details on how electronic colour values are achieved.
What's new | Specifiers | Painters | DIYers | Artists | Kids | Sitemap | Home | TOP ⇧

