From Habitat magazine - issue 06
A walk down a typical street of Ponsonby villas reveals that there is a fine line between trendy and timeless.
In recent times, one developer or renovator too many has itched to reshape the well-balanced verandahs, timber lace and bay windows of 100-year-old homes in a minimal modern – or post-modern – mould. Which makes discovering the renovation by Jonathan Walker of JWA Architects all the more a pleasurable surprise.
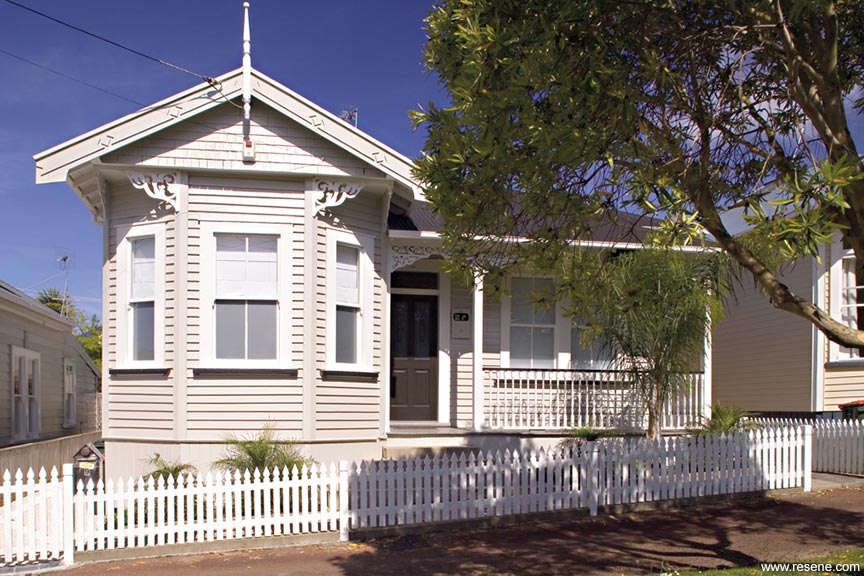
“I wanted to refer back to the original verandahed villas,” explains Jonathan. “The trick with the original house was that everything was balanced off a wide central spine. I wanted that hall to lead straight out to the back garden, with a sense of symmetry and rooms balanced on either side.”
The villa was bought in 1999 by Eva, its accountant owner, purely as an investment property. However, when she couldn’t find a house for herself that she liked, she decided to turn her investment into her own home. She turned to Jonathan, an old friend, to help her turn a two bedroom jumble of old rooms into an attractive, liveable city pad. Her brief was open and relaxed.
“I knew Jonathan did work like this, so it was really based on trust,” she admits, ”with lots of conversations, so it was an organic process.”
Jonathan’s experience with commercial projects and his knowledge of the client meant that he could create his own constraints.
“To appeal to most homeowners these days, houses have to have at least three bedrooms and two bathrooms”, he explains. “It also helps that I could see the potential of the property and that I had to get certain things right for this area.”
He also wanted to respect the original rhythm of the old house, the gracious welcome provided by the wide, high-ceilinged hallway and the protection afforded by the traditional verandah.
“In our practice, we want our residential projects to bring together a strong design concept and the fundamental need for a home to be an inviting place that reflects the personality of the owner,” explains Jonathan. “It’s pretty rewarding to work so closely together to achieve this.”
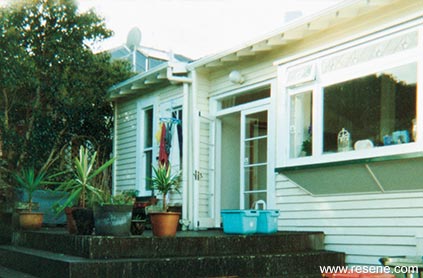
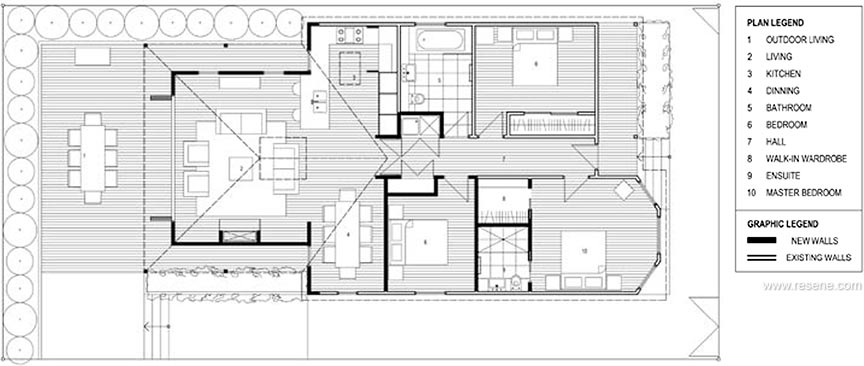
Although it is difficult to tell, the pair finished up rearranging most of the walls in the front of the villa to create space for a third bedroom, and an ensuite and dressing room off the master bedroom. A series of lean-tos at the back of the house was virtually demolished to make way for a new kitchen, dining and living room.
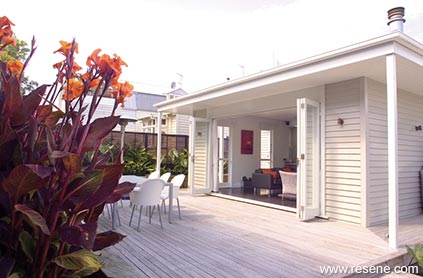
Eschewing the current mania for opening up the back of a villa into one big barn with an island kitchen, Jonathan created a pair of more intimate wings off either side of the hallway, one for the kitchen and one for dining, opening into the generous living room. He used changes in ceiling height and skylights to introduce light and airiness, and to define the separate spaces. And then, as in an old country house, he wrapped the square living room around with a verandah on three sides; a touch that further enhances the sense of balance from the hallway. The side verandah has the added benefit of affording intimate glimpses of the garden framed by long, narrow windows at the end of each wing.
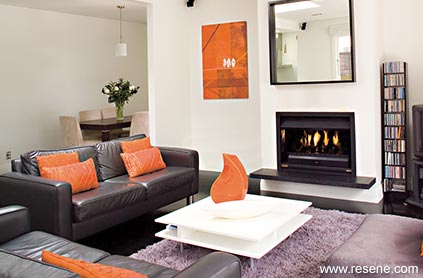
The satisfying square symmetry of the living room is that of a classical house, with a fireplace on one side balanced by a series of slit windows on the opposing wall. The back wall of bi-folding doors opens onto a courtyard deck, edged by fast-growing planting. Jonathan and Eva are still “debating” whether the original ivy should be allowed to grow back on the plastered brick wall. The house abuts one of Auckland’s early tram depots, with the wall providing a crisp backdrop to the villa. Jonathan rather likes the industrial crispness of an unadorned wall; she prefers the softening effect of greenery.
The six months of renovations were not without their shocks. Jonathan says architects casually speak of a “gut and go” project, where little but the front walls and floors remain standing, but Eva recalls returning from a trip and wondering what on earth she had done as she saw what seemed like the bomb-struck shell of her house. Only the front bay-windowed bedroom remained un-touched.
Battened ceilings were replaced, most walls were re-lined and insulated, the wiring was restored, and windows were re-worked. However, by the time she moved back in, there was nothing left to do and the house was ready for another 100 years of occupation.
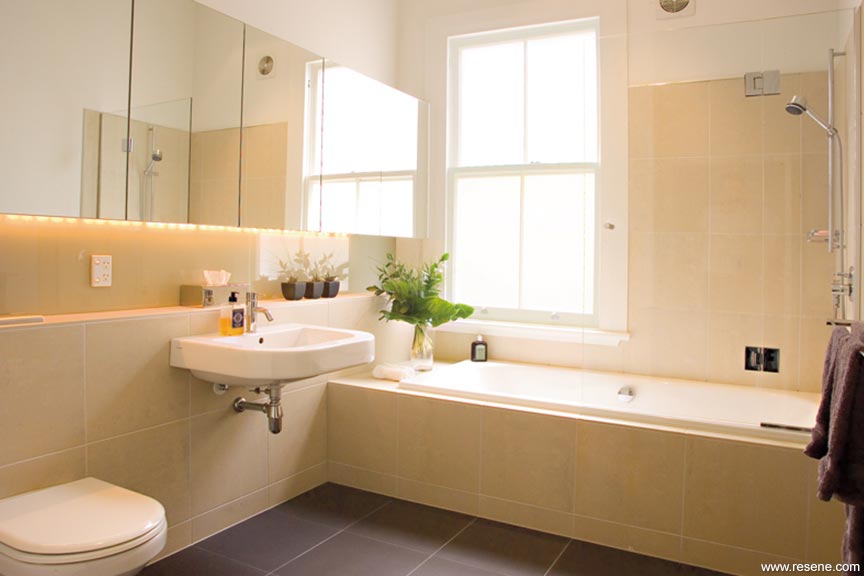
Although Eva swears she is not design-minded, it is clear she had a sure hand in the décor. She insisted on an all white – Resene Black White, the architect’s favourite, of course – colour scheme for the walls, deepened to Resene Tea on the kitchen cabinets. A palette of large matte-glazed charcoal and sandstone-look tiles provide a luxury finish in the ensuite and main bathroom, trimmed with Resene Tana. She had a couple of goes at the dark-stained floors, settling finally on a custom-mix based around Resene Walnut with a touch of black. She has not tired of the palette in four years, and her collection of paintings and sharp modern furniture pops out against the neutral background.

She still delights in new visitors to the house being surprised at the modern-meets-classic look when they step inside the traditional front door. The original lemon and green exterior paintwork was revamped, finished off with the greeny-black Resene Karaka front door. Landscaping front and back showcases a blend of modern natives, but with a traditional villa structure to the garden. The section even squeezes in a tiny white gravel parking space, worth its weight in gold on a tight city fringe site.
Jonathan, knowing Eva well, insisted on adding storage wherever he moved a wall. There’s a rank of mirrored cabinets, with spotlight underlighting for a feature shelf, in the bathroom; and a laundry in a cupboard off the hallway, mirrored by an equally large linen closet on the opposite side. He removed a pair of fireplaces to push through from the master bedroom into the adjoining third bedroom, to create a generous ensuite – almost the size of a regular bathroom – and matching walk-in closet. Original villa windows were reglazed with frosted glass to bring plenty of light into rooms overlooked by neighbours, and the third bedroom now serves as a large home office.
In the kitchen, he handed over to kitchen designer Roz MacPhearson to make the most of the space. Client and designer settled on an enclosed back wall of cupboards, half of which fold back to reveal a working pantry and appliance bench. When she has finished cooking, the owner can close the doors on the mess, leaving just sparkling stainless steel benches on show. Windows overlook the verandah and garden, a bonus for the cook, while a skylight draws morning sun into this end of the house. Again, every inch of storage was eked out, with Roz adding a second set of cupboards right to the ceiling to take less frequently used items. The kitchen bar is an obvious place for guests to plonk their wine glasses and hang out with the cook, without interfering with circulation.
The wing opposite to the kitchen contains the dining room. Again, changes in ceiling height and slivers of window give this space its own character, while borrowed light and views make it seem larger than it is. Jonathan intended the living room at the end of the axis to “feel like a pavilion, with glimpses of the garden all around”. That he achieved this on a tiny city plot is testament to the gentle, calculated use of weatherboard, covered porch and light.
“This is such a comfortable, beautiful house to live in,” says Eva. ”There is no wasted space, Jonathan was incredibly efficient at what he could fit into the floor plan, yet everything feels very open.”
Only 13% of homes in New Zealand were built before 1920, so you owe it to your neighbours and future generations to respect their character. Attention to detail can make all the difference to a renovation or restoration.
Find out about your house and neighbourhood: Your local council, libraries, museums or historical societies have great collections of photographs and documents to help you learn more about when your house was built, its original style, and the character of the neighbourhood when it was first developed.
Figure out the style or period of your house: Generic terms such as “villa” or “bungalow” actually cover many vintages. For example, early worker cottages from the 1860s and the simple villas of the 1880s are quite distinct from the later villas of the 1890s, when kauri milling peaked and tastes became more extravagant. Edwardian and later American bungalow or Arts and Craft style transitioned into the Californian-style bungalows, some being built as late as the 1930s to 1940.
Check what is authentic, what is not: Many older houses were altered as families grew or tastes changed. Some of these changes may be authentic to the period of your house and quite appropriate to keep. Others are more likely to have been part of later amendments made in the 1950s to 1970s, when heritage houses were not in fashion. Look around your neighbourhood or in streets with similar houses to see what works and get ideas of successful alterations. The New Zealand Historic Places Trust has a useful Guidelines for Altering Heritage Buildings. Check it out from your library.
Discuss your project ideas: Council planners, especially the heritage folks, are a goldmine of practical information. Talk to them before you get too far into planning, as they can direct you to architects who specialise in old houses, provide booklets and even offer small funding grants to help with restoration.
Talk to the NZ Historic Places Trust: s “Our role is to keep New Zealand’s heritage places alive and useful,” says Megan Patrick, heritage advisor in Auckland. “To achieve this we do permit changes to heritage dwellings to make them enjoyable places for people to live.” Staff will visit your property and provide free professional advice and guidance, but always allow a few weeks for discussions when you’re planning a project.
just because the look is traditional doesn’t mean it has to be old-fashioned
Debra DeLorenzo from DeLorenzo Design, suggests this alternative fitout:

In keeping with the character of this home, a more traditional look that incorporates an elegant palette of black, white and silver tones. In place of the mirrored wall units are white-lacquered tongue-and-groove cabinets painted Resene Black White. These sit on either side of a silver framed mirror over the hand basin. A pedestal beneath the hand basin fits in with the era, while a tall towel ladder provides additional space to hang towels.
To ensure privacy and maximise natural light, a leadlight window replaces the existing blinds. A chandelier in the centre of the room creates a feeling of luxury while providing mood lighting. The walls are papered in black-and-white Brocante China Rose wallpaper and the tiles have been sealed with Resene Waterborne Smooth Surface Sealer and painted Resene Black White.
Debra DeLorenzo, DeLorenzo Design phone: 04 565 3660 website: www.delorenzodesign.co.nz
Accessories: Towel ladder: Metivo, from Heirloom International. Lenoir Chandelier, from ECC Lighting & Living. Wallpaper: Brocante China Rose, from Pacific Wallcoverings. Leadlight window, from The Glass Shoppe. Mirror: English Frame, from Trendy Mirrors.
texture and colour create a Pacific feel
Kent Sneddon, head of design at Methven, proposes this alternative scheme:
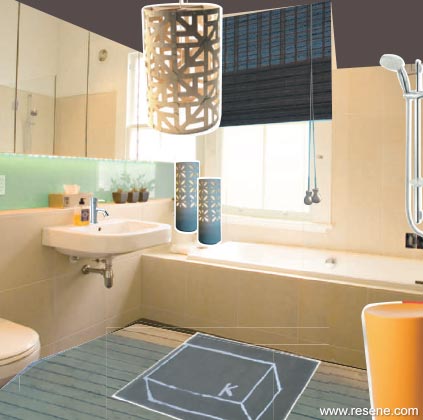
This design transforms the bathroom into a sanctuary, offering an escape from busy daily life. The space has a Pacific/ New Zealand-inspired flavour, thanks to the introduction of warm, textural elements, such as Coastal Woven blinds and bamboo flooring. Pacific influences also come through in the Tapa patterns on the ceramic lamps and in the Ulu lamp. The result is a comfortable, handcrafted feel, reinforced by the plush rug with its geometric pattern. The colour palette incorporates warm neutrals, lifted by bright accents in the form of green glass tiles, an orange container stool and the blue Tapa lamps. Moody-brown Resene Barista is used on the walls for a natural, earthy feel and to counterbalance the existing pale-neutral tiles.
Kent Sneddon, Methven Ltd phone: 09 829 0429 email: ksneddon@methven.net website: www.methven.com
or contact Methven, 0800 804 222, info@methven.net
Accessories: Ulu lamp, from Eon Design Centre. Shower mixer: Methven Satinjet handset and slideshower, Methven Minimalist sink mixer, from Chesters Plumbing and Bathroom Centre. Container stool, from ECC Lighting & Living. Diagram rug by Paul Cullen, from Dilana Rugs.
words: Kate Williams
pictures: Kallan MacLeod
Search habitat magazine stories
Printed copies of habitat highlights are available from late March 2024 at Resene ColorShops and resellers, while stocks last. You can view back issues of habitat magazine online.
Specifiers:
If you have an idea, project or story that you think would suit habitat, we’d love to hear from you. Please drop us an email with your details and include photos if submitting a project.
Sign up for a DIY card and Save! Australia | New Zealand
![]() Get inspired ! Subscribe
Get inspired ! Subscribe ![]() Get saving ! Apply for a DIY card
Get saving ! Apply for a DIY card
![]()
Can't find what you're looking for? Ask us!
Company profile | Terms | Privacy policy | Quality and environmental policy | Health and safety policy
Colours shown on this website are a representation only. Please refer to the actual paint or product sample. Resene colour charts, testpots and samples are available for ordering online. See measurements/conversions for more details on how electronic colour values are achieved.
What's new | Specifiers | Painters | DIYers | Artists | Kids | Sitemap | Home | TOP ⇧