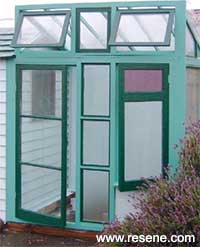
The harsh winter weather can wreak havoc in the garden. Protect your plants with our DIY glasshouse.
You will need:
Also required: Selection of large and small galvanised nails exterior wood glue exterior silicon sealer, hammer, screwdriver, paintbrushes, glue gun and a skilsaw, Resene Quick Dry acrylic primer undercoat, Resene Lumbersider in Resene English Holly, Resene Patina, Resene Cutty Sark and Resene Jet Stream
Handy hint: When constructing your glasshouse, use a set square and builder’s level to ensure the walls are at 90 degrees. Our glasshouse adjoins an “Astor” kitset shed from Cedarshed Industries Ltd.
![]()
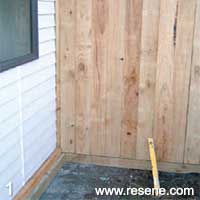
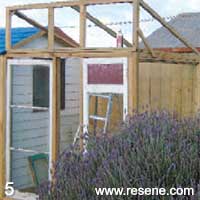
Step 1
Against the side wall of the shed, create a level square base with the four 100mm x 100mm fence posts. On a flat surface, construct the rear wall panel from five 50mm x 50mm fence battens and 12 fence palings using galvanised nails and exterior wood glue. Fix the rear wall panel into upright position, nailing through the timber base and shed wall.
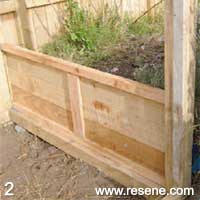
Step 2
Using galvanised nails and exterior glue, construct the low side wall using three horizontal fence panels and 50mm x 50mm battens and fix four upright 50mm x 50mm battens at the front corner (as shown). Fix a 50mm x 50mm batten along the lower front edge of the wooden base frame.
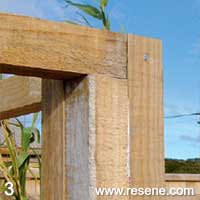
Step 3
Using galvanised nails and glue, fix an upright 50mm x 50mm batten at the other front corner, nailed directly to the shed wall, fix one 50mm x 50mm batten along the top edge of the front wall and another along the top edge of the side wall as shown.

Step 4
Hang the hinged front window and door and fix inner upright framing on the front wall using four 25mm x 50mm battens. Construct lower section of front wall (under window) using remaining fence palings and create an angled sill from an offcut of fence paling. On the side wall create a glazing frame from the 25mm x 50mm battens and fix the glass pane into place and hold with silicon sealer and 20mm x 20mm moulding.
Step 5
Using 50mm x 50mm battens, construct the upper front window frames, supporting the structure with central and end roof battens as shown. Prime roof battens with one coat of Resene Quick Dry Acrylic Primer Undercoat‚ and finish with two coats of Resene Patina.
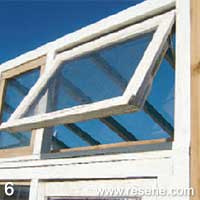
Step 6
Fix the two hinged windows within the upper frame and create a fixed central window using the 25mm x 50mm battens. Using 25mm x 50mm battens, create three fixed windows down the centre of the front wall panel. Measure and have glass cut to fit and hold in position with silicon and 20mm x 20mm moulding. Fit the remaining four 25mm x 50mm roofing battens.
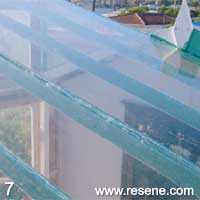
Step 7
Using 25mm x 50mm battens, create two triangular side windows – one in line with the pitch of the shed roof, the other with the pitch of the glasshouse roof. Glaze these, supporting the glass with 20mm x 20mm moulding and silicon sealer. Fix safety glass panels to roof with silicon sealer and hold in position with nails supporting lower edge.
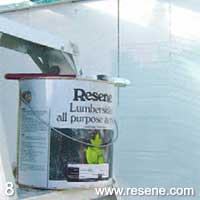
Step 8
Prime all wooden surfaces with one coat of Resene Quick Dry Acrylic Primer Undercoat‚ then two coats of the following: Resene English Holly for the shed roof and front window frames, Resene Patina for the outer window frames, Resene Cutty Sark‚ for the shed door and Resene Jet Stream for the glasshouse and shed walls.
![]() Get inspired ! Subscribe
Get inspired ! Subscribe ![]() Get saving ! Apply for a DIY card
Get saving ! Apply for a DIY card
![]()
Can't find what you're looking for? Ask us!
Company profile | Terms | Privacy policy | Quality and environmental policy | Health and safety policy
Colours shown on this website are a representation only. Please refer to the actual paint or product sample. Resene colour charts, testpots and samples are available for ordering online. See measurements/conversions for more details on how electronic colour values are achieved.
What's new | Specifiers | Painters | DIYers | Artists | Kids | Sitemap | Home | TOP ⇧